
I played with the original iRobot Create when it first came out (see “Commanding the iRobot Create”). It was a customized version of the current-day Roomba with a bay for additional hardware. The iRobot Create Command Module, based on an Atmel AVR, was one that allowed the robot to be controlled via a serial port. The Create Command Module plugged into the socket in the bay that was on the top.
The Turtlecore from Gumstix was an alternative to the Create Command Module (see “TurtleCore Tacks Cortex-A8 On to iRobot Create”). The Turtlecore had a socket for a Gumstix module that could include one of their wireless solutions. I was able to run control applications on Linux, including ROS (robot operating system), although it was a bit early and took some time to get things running.
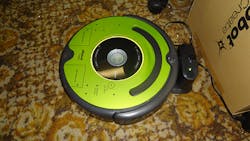
Times have changed and so has iRobot. Its new iRobot Create 2 (Fig. 1) is based on a stock Roomba versus the more customized iRobot Create. It is easily identified by the green cover that doubles as a template, so it can be cut and drilled without destroying the robot.
Under the cover is a socket that provides power and serial port. The Create 2 comes with a USB adapter and a long cable that plugs into the socket. I downloaded a sample Python application that runs on a PC to remotely control the wired robot. This approach is a handy way to test the system, but not too practical for remote operation.
On the other hand, USB is a useful interface for any one of a crop of small boards like a Raspberry Pi 2, BeagleBone Black, or something from the Arduino family (see “Arduino, Raspberry Pi, or BeagleBone?”). The idea is actually to use one of these boards connected to the socket to draw power and provide control. The challenge is that this cannot be done using the USB cable unless external power is provided to the board.
The alternative is to connect the Create 2 to a board directly, but users need to keep power and interface requirements in mind. Normally a power module will be needed to modify the power from the Create 2 and the serial interface should have additional buffers.
I had not built a custom cable for any of the boards I have handy, so I decided to mount a Linear Technology mote on top (Fig. 2) to tag along. It could control the Create 2 as well, but that still would require the connector that is on order. Linear Technology’s Dust Networks SmartMesh module has a built-in wireless connection to the half a dozen other motes spaced around the lab. It has its own power supply, so it was simply along for the ride.
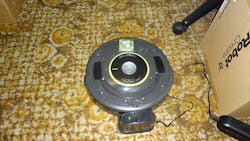
The Create 2 is programmed via the serial interface, but it retains most of the vacuum cleaning capabilities. It does lack the brushes, so it is not usable as a cleaning device—but then again, it is designed for STEM applications. The mote got a ride as the Create 2 ambled about the floor doing its best to clean it, or at least cover the area like it normally would. Even the docking capability is retained, which is probably the most useful feature of the entire system.
The Create 2 uses the standard Roomba docking station that has an IR beacon on it. This allows the Create 2 to home in on the docking station on it and orient itself. It then drives up on the charging station and stops once it receives power.
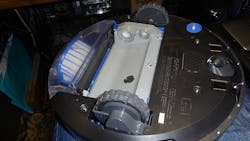
Looking at the bottom of the Create 2 (Fig. 3) shows what is missing. The brush module goes in the center. It is not included. Instead, it can be used for the control logic. This figure shows the vacuum bin. The white filter covers the fan and motor. The whole unit slides out. This would normally be where the dirt is collected, allowing easy removal. It also turns out be an easy way to install control logic.
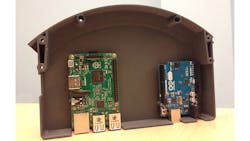
There are quite a few free bin designs on the Internet that can be created using a 3D printer. A large, single-bin base (Fig. 4) requires a 3D printer that supports large volume. Of course, there are a number of two-piece designs that can be easily done using even the smallest 3D printer. There are also designs that add a socket for another caster on the back to handle heavier loads. There is one in the front providing a three-point wheel system for the default configuration.
Putting the control board and support electronics in the bin makes a lot of sense. It is easily removable and most designs have a cable that plugs into the control socket on top. There is not a connection underneath the robot. Still, this allows a single robot to be used by a number of people, as in a classroom setting, to test their designs.
Designers do need to keep the IR sensor top of mind if they use the automatic docking support. It is possible to mount objects on top. As noted, the green cover shows where holes can be drilled without killing the robot.
The serial interface commands have improved along with the overall system functionality compared to the original Create. Applications will have access to the sensor suite and the system can be programmed for limited navigation on its own. Typically users will want their host processor to handle the higher level details. You can download the API and manuals for the Create 2 from iRobot’s site and there are a number of project sites highlighting their approach to the Create 2.
Users will need to keep in mind baud rate synchronization at higher speeds than the system can handle. Some boards cannot generate accurate enough timing to match the Create, so slower speeds are required. Even 19,200 has latency issues. The interface speed tends to be the limiting factor for most applications.
More ambitious users can bypass the control system and drive the motors directly. This takes a bit of work, but there is enough information online to do this. Hooking into the sensors is a bit harder, so I would not be surprised to see a system that controls the drive motors directly for better response and use the on-board electronics to utilize the sensors.
The Create 2 is clearly for more advanced STEM users. At least temporary access to a 3D printer is very useful. It also helps to be handy with tools that work with plastic to mount things like antennas and other sensors like cameras.
Overall, the Create 2 is a significant step forward compared to the original Create. It also is a compact platform that is ideal for testing any number of robotic applications from a telepresence robot to a more advanced vacuum cleaner. It has a proven drive and control system. Best of all, there are spare parts available. Just ignore the extra brushes and filters that tend to be the more common items.
I will be doing a bit more with the Create 2 once I can find a way to build a new bottom bin. Right now it has a battery-powered BeagleBone Black and the USB adapter taped to the top. That is not the best approach, but it works for now.
About the Author
William Wong Blog
Senior Content Director
Bill's latest articles are listed on this author page, William G. Wong.
The latest blogs have been moved to alt.embedded on Electronic Design.
Bill Wong covers Digital, Embedded, Systems and Software topics at Electronic Design. He writes a number of columns, including Lab Bench and alt.embedded, plus Bill's Workbench hands-on column. Bill is a Georgia Tech alumni with a B.S in Electrical Engineering and a master's degree in computer science for Rutgers, The State University of New Jersey.
He has written a dozen books and was the first Director of PC Labs at PC Magazine. He has worked in the computer and publication industry for almost 40 years and has been with Electronic Design since 2000. He helps run the Mercer Science and Engineering Fair in Mercer County, NJ.
- Check out more articles by Bill Wong on Electronic Design
- Bill Wong on Facebook
- @AltEmbedded on Twitter
Comment About the Article
To join the conversation, and become an exclusive member of Electronic Design, create an account today!

Leaders relevant to this article: