Members can download this article in PDF format.
What you’ll learn:
- The importance of proper battery charging.
- Two main schemes for battery charging.
- How to design a CCCV battery charger.
- Test results from the CCCV-based design.
Battery-powered electronic devices have become one of the key elements of everyday life, and it’s more practical and cost-effective to use rechargeable batteries over those that need frequent replacement. Battery chargers are an important part of the power-management system of such devices. The battery-charging process has evolved, including the procedure by which the battery is charged and the circuit implementation of this procedure.
Several battery cells are available for supplying electronic devices, each of them with different advantages and disadvantages. This portfolio of battery types, however, is reduced when considering portable devices that also must be lightweight. With this constraint, Li-ion, Li-polymer (LiPo), and LiFePO4 batteries are the most used cells in real applications, with LiPo batteries at the top of the list.
Li-polymer batteries are rechargeable batteries that use Li-ion technology with a polymer electrolyte instead of a liquid electrolyte. The polymer electrolyte is formed by a high-conductivity semisolid (gel) that allows this battery type to be made in almost any size or shape. LiPo batteries provide higher specific energy than other lithium battery types. They have a nominal cell voltage of 3.7 V, which is converted to a standard voltage for battery-based applications. When higher voltages are required, such as 7.4 V, two LiPo cells are connected in series.
The second parameter that’s usually analyzed is the battery capacity. Battery capacity—a measure (typically in amp-hours) of the charge stored by the battery—is determined by the mass of active material contained in the battery. LiPo batteries have been developed for different capacities, from 80 mAh for small-sized low-power applications to 8 Ah for motor-based portable devices such as drones and remote-controlled cars.
One of the key features that must be controlled to obtain better battery performance, in terms of available capacity and battery life, is the charging process. The charging process has evolved to boost performance, and the hardware has been miniaturized to achieve smaller chargers that can be included in portable devices without a large increase in weight and size. Here, we'll design the charging process and power stage of a Li-ion, LiPo, and LiFePO4 battery charger using a HVPAK SLG47105 mixed-signal device and passive components to make a small monolithic battery charger.
Battery Charging Schemes
Batteries can be charged with different processes involving different current and voltage regulations, usually called a charging scheme. For lithium-based batteries, two main schemes are applied in real applications: the pulse charging scheme and the constant-current constant-voltage (CCCV) scheme. These schemes are designed to extend battery lifetime.
Over the course of many electrochemical reactions, the internal structure of a battery gradually depletes, decreasing battery life. In addition, each charge cycle stresses the battery structure and causes battery degradation. This puts a limit on the number of recharge cycles. To extend the number of recharge cycles, different battery charging schemes follow a profile designed to ensure safety and long life without compromising performance.
Pulse Charging Scheme
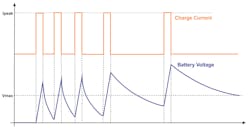
The simplest charging scheme is pulse charging, whereby a high-peak short duration current pulse is applied to the battery. The high current level initially generates a battery voltage spike higher than the battery’s rated maximum voltage. The battery voltage recovers normal levels when it can fully absorb the injected charge, after which the battery voltage reaches a level higher than before applying the current peak.
The process is repeated several times until the battery voltage reaches the nominal battery voltage. This sequence is shown in Figure 1.
The pulse charging scheme is one of the most popular schemes due to its simple and cost-effective implementation. However, the pulse scheme also has many disadvantages. For instance, the battery voltage spikes are usually lower than the maximum voltage that the battery can tolerate without damage. This is always true for batteries such as lead-acid batteries, but not always in lithium-based versions. Lithium-based batteries are highly sensitive to voltage, so the spikes can damage them.
Moreover, the high peak current pulses can generate excessive heat, causing temperature overloads. This can be quite dangerous—it could cause the battery to explode or catch fire. Thus, the pulse charging scheme is undesirable for lithium batteries.
CCCV Charging Scheme
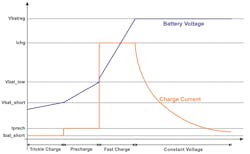
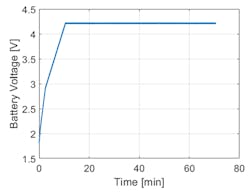
The CCCV charging scheme is based on four phases (Fig. 2). The first phase, usually called the trickle charge phase, is designed to test if the battery is working properly or is damaged without applying voltages or currents that could otherwise be dangerous. It’s accomplished by applying a constant charging current to the battery until the battery voltage reaches a minimum level, usually called Vbat_short. The constant-current level used in this phase (Ibat_short) is normally 5% of the full charging current (called Ichg) to avoid excessive heating if the battery is damaged.
Once the battery shows proper operation by increasing its voltage over Vbat_short, the second charging phase, precharge, is started. The constant-current level Iprechg used in this phase is usually 10% of the full charging current Ichg. This phase continues until the battery voltage reaches the minimum operational voltage, called Vbat_low, which typically corresponds to about 70% of battery nominal voltage.
When battery voltage is over Vbat_low, the constant-current or fast-charge phase is started, applying the fast-charge current (Ichg) to reach 100% of battery capacity. The constant current is applied until the battery voltage increases to the battery regulation voltage (Vbatreg). This is done to avoid applying high constant-current phase, which can cause the battery voltage to increase over its maximum rated level, thus damaging the battery and triggering excessive heating.
When the battery regulation voltage is reached, the fast charge phase is stopped, and the fourth phase—the constant-voltage phase—is started. In this phase, a constant voltage equal to the rated regulation voltage of the battery is applied.
In this case, the battery auto-regulates its current, absorbing as much charge as needed to continue the charging process. As the battery continues to charge, its current starts to decrease. When the current drops to the precharge current level (10% of Ichg), the voltage regulation phase finishes and the battery can be considered fully charged.
With the battery in a charged condition, the charger can automatically control its voltage. When the voltage drops to the recharging voltage Vbat_rchg, usually 96% of nominal voltage, the charging process is started again.
The constant-current and constant-voltage phases are why this charging scheme is called CCCV. The accurate control of voltage and current makes this scheme very popular for batteries sensitive to voltage and current levels, such as lithium-based batteries.
The CCCV charging scheme involves multiple phases with different start and end conditions and different current or voltages levels, so it requires a more complex implementation. Several commercial ICs from different vendors implement this charging scheme. These usually require several external components, not only for the configuration and voltage and current regulation, but also to implement the power output stage.
In this article, we'll use this scheme for the monolithic battery charger with an integrated power output stage. This charger is externally configurable, so all voltages and currents are selectable by the user.
Battery Charger Design Diagram and Schematic
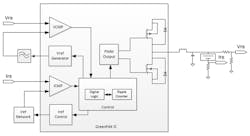
The monolithic battery charger using the SLG47105 is shown in Figure 3. The battery power supply is generated with a high-frequency pulse-width modulator (PWM) switching the internal high-voltage GPIOs of the SLG47105 configured as a half-bridge. As the current drivers for the battery charging process, these pins switch the output inductor to generate the desired regulated output voltage.
The PWM, generated with the internal PWM module of the HVPAK IC, is controlled internally based on voltage and current feedback via the analog comparators and current-sense modules. The voltage and current references for regulation are controlled internally, generating the reference level for the corresponding charging phase.
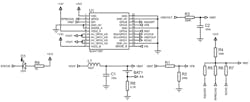
The entire process, including all phases of the CCCV charging scheme, are controlled with internal lookup tables (LUTs) and ripple counters configured to implement a state machine that generates all the signals required. The block diagram in Figure 3 is represented in the schematic circuit shown in Figure 4. It includes the required external components for voltage- and current-level configuration and the output filters for battery charging.
As shown in the circuit diagram, the system output connected to the battery is filtered with a 10-µH inductor and a 100-µF non-polarized capacitor. These values are selected to filter the high-frequency component of the 98.04-kHz PWM output.
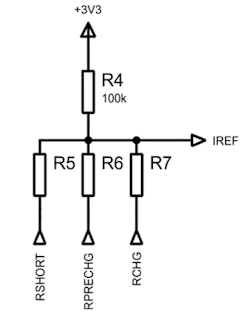
The circuit in Figure 5 (the Iref network) is used to configure the trickle charge current Ibat_short, the precharge current Iprechg and the fast-charge current Ichg.
The values of the three resistors are determined by the following equations:
By selecting these resistors, all current levels for battery charging can be configured so that the charger can adapt to the battery charging requirements. The charger can drive up to 2 A. Similar concepts may be applied for battery voltage feedback. The battery voltage feedback is controlled by the charger to reach the conditions of each charging phase, and finally, in the last step, to regulate it.
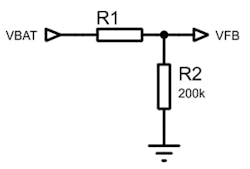
To implement this control, the system requires a voltage signal that must be obtained with the resistor-divider network shown in Figure 6. The network illustrated in Figure 5 also allows the user to configure the battery's nominal voltage.
The battery charge voltage is configured with the following equation:
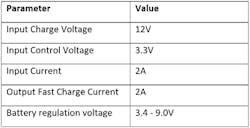
Resistor R1 is the high-side resistor from the battery to the current feedback pin, and R2 is the low-side resistor from the feedback pin to GND. The recommended value for resistor R2 is 200 kΩ or lower. In addition, 1% or higher accuracy is needed for both resistors to obtain the best resolution. The state pin is a digital output indicating the charging state. When this pin is high, the battery is charging. When it’s low, the battery is charged, and the process has finished. This implementation results in a battery charger with the characteristics listed in the table.
The monolithic battery charger is implemented on an SLG47105V. This circuit contains internal PWM generators, analog comparators, current sensors, and high-voltage integrated dual H-bridge/quad half-bridge functionality. These can be used to generate the charging voltage and current required for battery charging with the corresponding signals for voltage and current regulation.
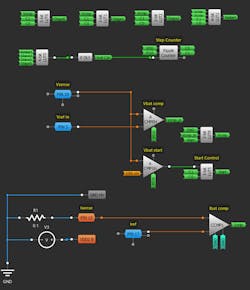
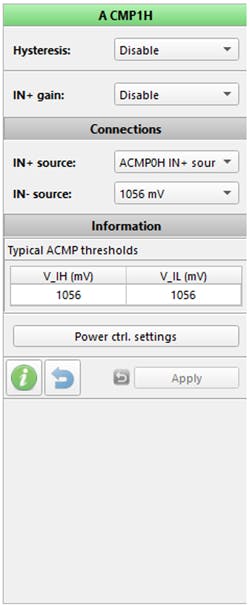
The CCCV phase control is implemented by using the internal ripple counter and the voltage and current feedback signals (Fig. 7). The trickle charge phase is represented internally as state zero of the ripple counter, and it’s the first state of the control. In this state, ACMP1H controls the battery voltage continuously until it goes lower than Vbat_rchg. When this condition is met, the start control 3-bit LUT5 enables the entire system to start the charging process, also activating the voltage output.
Each phase has a LUT, located in the upper side of the figure, waiting for the predefined conditions that must be reached to move on to the next phase. These conditions depend on the voltage or current levels that are compared with the comparators ACMP0H and CCMP1.
As an example, when the charger is in the first phase, the voltage must increase above Vbat_short to go to the precharge phase. This is made by a pulse generated from the 3-bit LUT0, which only sets high when the counter is zero and the feedback voltage is higher than the reference voltage connected to ACMP0H.
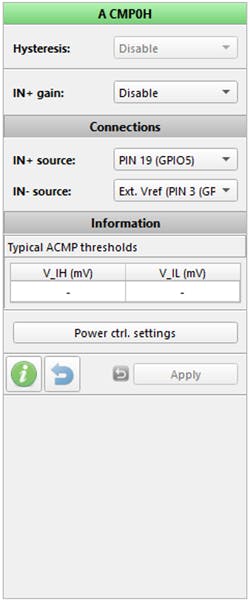
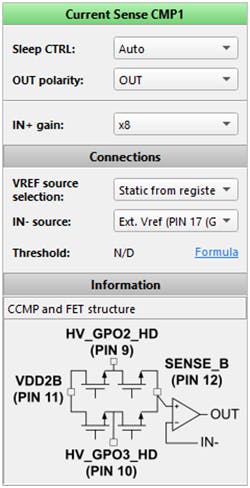
In this condition, the generated pulse increases the ripple counter to the next step, and the 3-bit LUT1 takes the control. This dynamic is repeated over the entire charging cycle. The configuration of both analog comparators and the current sensor can be seen in Figures 8, 9, and 10.
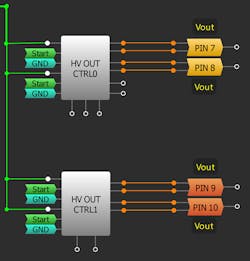
As mentioned previously, the battery voltage charging is generated and regulated by a PWM connected to the high-voltage GPIOs of the HVPAK configured as a half-bridge. Such a configuration is required to obtain the desired voltage with a high current output without converting the battery with a floating charge (as it would be if an H-bridge were used). This requirement disables the option of using the current sense connected to the HV GPIO port used for the battery, since the current could not be sensed in the half-bridge branch.
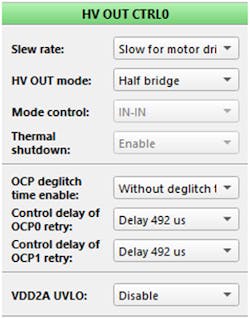
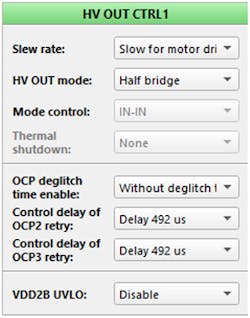
As current must be measured to regulate it, the current sensor of the second HV GPIO SLG47105 is used. The second port was configured in High-Z; thus, there’s no current over it and the external shunt resistor of its current sensor can be used as the shunt resistor of the battery current. The HV GPIO port connections and configurations are shown in Figures 11, 12, and 13.
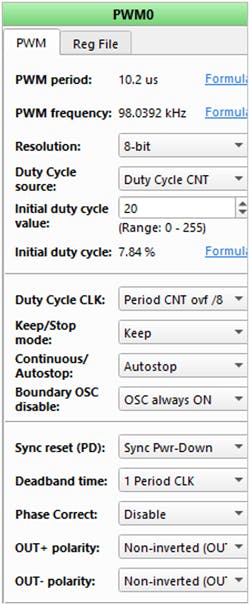
To generate the PWM signal for voltage and current regulation, the PWM0 module is used. PWM is configured to 98.04 kHz, which can be generated with the high-frequency 25-MHz internal oscillator. The duty-cycle control is configured as a duty-cycle counter; it can be incremented or decremented with an external control signal.
This control signal is obtained from the voltage and current sensors. Therefore, depending on the current phase of charging, one of those signals controls the output. When current must be regulated, the current-sensor comparator output determines if the PWM duty cycle must be higher or lower to regulate the desired current.
When voltage must be regulated, the analog comparator controls the PWM in the same way. The PWM is connected to HV OUT0 to control the half-bridge output. Figure 14 shows the configuration of the PWM0 module.
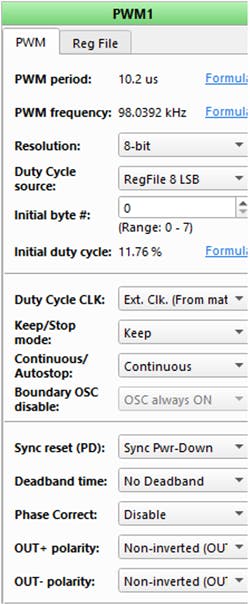
As shown previously, voltage control is implemented with the analog comparator ACMP0H connected to the voltage feedback and an external reference voltage. To generate the reference, the PWM1 module is filtered with an external first-order RC low-pass filter. The PWM 1 module is configured to generate a 98.04-kHz PWM output signal with a configurable duty cycle from the internal register file.
Each time the system advances to the next phase, the PWM receives a control pulse to increment the register pointer, so that the next required voltage reference is generated. The PWM output is connected to PIN 15, filtered, and connected to Pin 3 as reference input voltage. The connection of both PWM 0 and PWM1, and the configuration of the PWM1 module, are shown in Figures 15 and 16.
Similar ideas of voltage-reference control can be applied to current-reference control. Current control is implemented with the current-sense comparator CMP1 connected to the shunt resistor and an external reference voltage related to current levels.
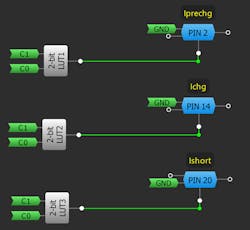
To generate the reference, three resistors connected to a resistor network are used (Fig. 5, again). Each time the system advances to the next phase, the system connects the corresponding resistor by enabling the corresponding pin (PIN 2, PIN 14, or PIN 20) and configuring the others as High-Z.
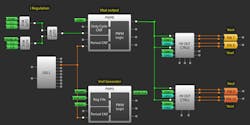
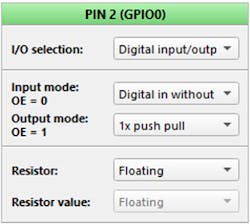
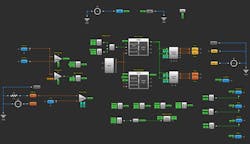
With that implementation, one of the three resistors is connected to the resistor-divider circuit while the others are disabled. This requires the pins named above to be configured as Digital Input/Output, with the data output connected to GND and the Output Enable input controlled by the internal system logic. Figures 17 and 18 show the connection of each pin and the configuration of PIN 2. The entire battery charger implementation diagram is provided in Figure 19.
Tests and Conclusion
To test the implementation, the system was assembled and analyzed with a waveform recorder to analyze battery current and voltage. A fully discharged LiPo battery was used. The battery, with a nominal voltage of 4.1 V, was charged with a fast charge current of 1 A.
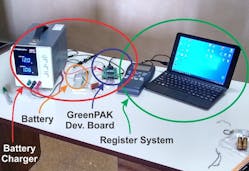
For this configuration, R1 and R2 of the voltage feedback network were 560 kΩ and 200 kΩ respectively, while Richg, Riprechg and Ribat_short were 2482 Ω, 242.7 Ω, and 84.7 Ω respectively. The entire system can be seen in Figure 20.
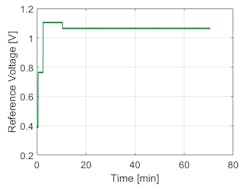
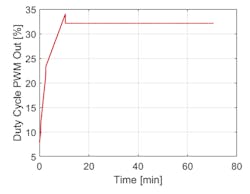
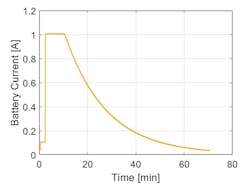
To analyze the results, we logged the voltage and current waveform at the battery, the reference voltage output used for voltage regulation at different charge phases, and the PWM output duty cycle.
Figure 21 shows the reference voltage output generated by the HVPAK that is compared with the battery voltage feedback obtained from the resistor divider network in Figure 6. Figure 22 depicts the duty cycle of the PWM output signal for CCCV battery charging.
Note that the duty-cycle spike corresponds to the change from the fast-charge phase to the constant-voltage phase, and the charger changes from constant-current regulation to constant-voltage regulation. These images reveal the expected dynamic on both signals for a CCCV-based battery charger. Figures 23 and 24 show the output voltage applied to the battery and its current. The output voltage and the current have the expected shape of the CCCV charging scheme.
In this article, we implemented a monolithic battery charger for lithium-based batteries using the CCCV charging scheme and implemented it on the HVPAK SLG47105V. Miniaturized and efficient battery chargers like this one are extremely important in today's electronics market. The size of the entire measurement system is smaller than many other implementations, and it highlights where HVPAK can be used to replace other commercial devices.
Reference
The complete design file can be found here. It was created in free GUI-based GreenPAK Designer software—a part of Go Configure™ Software Hub.

