A Teardown of the Trek Sensor Bicycle Speedometer
I use bicycle speedometers on my five old Harley Sportsters. They’re smaller, lighter, and far more accurate than a mechanical speedometer. I tried several brands over the years, but have found an older Trek Sensor model to be the best. It has a regular and a trip odometer, with an understandable display. Best yet, it’s fairly intuitive to program and reset.
A Trek speedometer on my bike stopped working when the left pushbutton stopped functioning. This made it impossible to reset the trip odometer to zero miles, as well as allow me to change the display to the various functions.
I was not too concerned since I have six spare units. To my horror, when I tried to program any of the other speedos, I found that none of the buttons would work on any of the units. It turned out that the designers made their own switches by taping a Belleville washer cupped spring over gold-plated pads on the printed circuit board (PCB). After a decade or two, the adhesive from the tape had leached under the washers and prevented electrical contact. I could understand this happening on the units mounted on my motorcycles, since they were in my hot Florida garage for a few years. Yet even the spare units that had been inside the house had this same failure mode.
Every time I see system engineers regard a switch or connector as trivial and design their own, things go wrong. I once worked for a Palm Pilot accessory startup. They disliked the terms of the contract for the docking connector. The company asked that we limit any order to less than 45,000 per month. Heck, we never sold 100 of them, as the project eventually failed.
But a co-worker thought it would be better to design our own connector using springs and ball bearings to make contact with the edge-card connector in the Palm Pilot. I convinced him that contact design is not trivial and takes long experience and lots of testing. Thankfully, I prevailed and we just bought the real docking connector from the reputable manufacturer.
When it comes to switches and connectors, leave it to the experts at Omron and NKK and CK, as well as Tyco and Molex and Amphenol, to name just a few. This speedometer is a case in point. I tore down one unit, and was delighted to find I could fix the switches with solvent and Scotch tape, as seen below. I fixed all six spare units, and have them in reserve to replace any bad speedometers on my motorcycles.
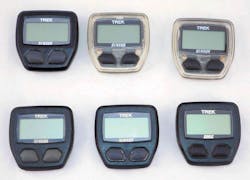
The Trek Sensor bicycle speedometer is an older model that works fine on motorcycles. They came in opaque and clear cases. The very early model was called a Trek Sonic.
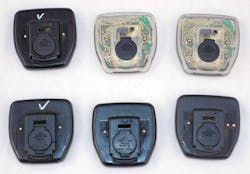
The backside of the Trek Sensor speedometer has a compartment for the battery as well as two molded-in contacts for the mounting shoe that connects to the magnetic pickup. You mount a magnet on the wheel and the speedo senses each full revolution. By programming in the circumference of the wheel in centimeters, you get a very accurate speedometer.
The case halves snap together. There’s an O-ring on the top half that provides water resistance. The problematic switches are the two silver domes on the gold-plated pads on the PCB. You can just make out the little squares of clear tape holding the domes to the circuit board.
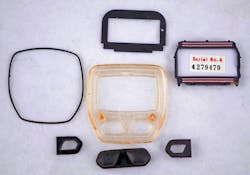
At the left is the O-ring. Above the top case-half is the black plastic placard that has the logo and model name. To the right is the LCD module, with a plastic holder and zebra-strip contacts to mate with the PCB. At the bottom is the rubber pushbutton surface and two black plastic retainers.
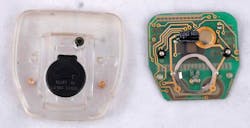
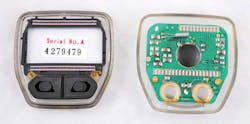
The back of the circuit board has the battery holder and another one of those infernal home-brew switches for a reset function. The contacts for the magnetic sensor are directly attached to the PCB. The large capacitor provides hold-up, so if you change the battery swiftly, you won’t lose the programming. This particular unit was the only one with green corrosion on the center battery terminal. I cleaned it with a small wire brush and applied DeoxIT contact treatment.
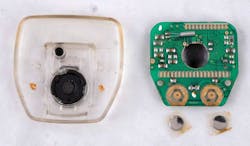
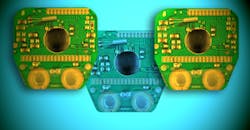
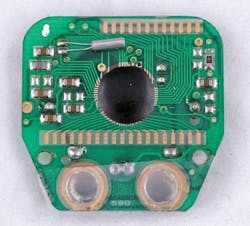
The top side of the PCB has the programming and mode switches, here removed so you can see the tape that held the spring washers to the PCB. The microcontroller is a chip-on-board (COB) unit, with the watch crystal at the top left along with a handful of capacitors as well as one resistor.
I cleaned the domes and circuit board with Goof Off, the adhesive cleaner. Then I put a small drop of DeoxIT Gold on the gold PCB pads. I re-secured the domes with plain old Scotch tape. All six units worked perfectly after this procedure.
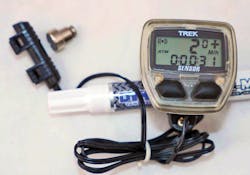
Once the switches worked, I could initialize the speedometer with wheel size, date, time, mph vs. kph, and the odometer setting. That’s one of the things I love about the Trek Sensor—you can program in the odometer setting after a reset or battery failure so that you don’t have to start at zero every time. I connected the magnetic sensor and waved the wheel magnet near it to verify the speedometer was working. I used a Dykem white paint marker to mark the back of the units as I fixed them.
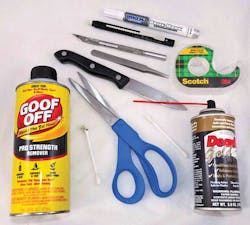
Even a simple job requires a plethora of tools. The Goof Off and DeoxIT did the work, but I needed Q-tips to scrub and apply them. An X-acto knife and scissors cut the Scotch tape. Tweezers were essential to peel the old tape off, as well as position the domes and new tape. I used the knife to pry the case-halves apart. I tried the eraser pen to clean the gold contacts, but it wasn’t really needed.
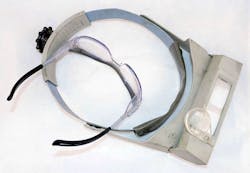
To fix anything, you need to see it. I used my 3M Nuvo safety/reading glasses, as well as a machinist magnifier, to see what I was doing. The safety glasses protect your eyes any time you have spray cans. No matter how careful you are, they always spritz in your eye.
Not only was this fix 100% successful, I found a nice Maxell button battery cross-reference guide. The speedometer manual specified an alkaline L43 battery cell. That cell has 55-mAh capacity. The cross-reference chart shows the silver-oxide SR43W to be the exact same size, but with a capacity of 125 mAh, more than twice the LR43. I found a 5-pack on Amazon in the equivalent 386 size; much cheaper than the 4 bucks each they wanted at the drug store. Heck, I only paid 10 bucks for most of the speedometers on eBay. With all of these spares, my plan is to have two speedometers on each of my five motorcycles, for redundancy.

About the Author

Paul Rako
Creative Director
Paul Rako is a creative director for Rako Studios. After attending GMI (now Kettering University) and the University of Michigan, he worked as an auto engineer in Detroit. He moved to Silicon Valley to start an engineering consulting company. After his share of startups and contract work, he became an apps engineer at National Semiconductor and a marketing maven at Analog Devices and Atmel. He also had a five-year stint at EDN magazine on the analog beat. His interests include politics, philosophy, motorcycles, and making music and videos. He has six Harley Sportsters, a studio full of musical instruments, a complete laboratory, and a video set at Tranquility Base, his home office in Sun City Center Florida.
Comment About the Article
To join the conversation, and become an exclusive member of Electronic Design, create an account today!

Leaders relevant to this article: