The Life Upgrade Holiday Gift Guide for 2025
What you'll learn:
- How to treat your most important engineering asset, yourself.
- Items that changed my life for the better, and how they will change yours.
- Key technologies to focus on.

It's that time of year again.
The holiday season?
No!
It's time to buy yourself something at a righteous discount on Black Friday and Cyber Monday. But, yeah, also the holiday season, I guess.
Ask younger people what the origin of the terms "Black Friday" or "Cyber Monday" is, and they have no clue. They'll most likely ask, "What's a cyber?" I see a future where these terms simply represent a day to celebrate cheap prices, the etymology steeped in some lost, arcane knowledge. That's the future…
The deals are here now!
I'm putting this list together not to share greedy indulgent items, but for an altruistic purpose. I want to make your life better. I'm sharing a collection of things that improved my life and my efforts as an engineer, and I'm sure they'll change your life, too.
Some changes may start out unnoticeably, but they will ultimately be indispensable. Perhaps others will be an immediate overhaul to your life, and a welcome one at that.
Let's improve you and your body. You're an engineer or engineering-related; realize that your body is your greatest tool. Take care of it.
Your Hands: Carpio 2.0
Repetitive strain injury (RSI) is a big problem in our world. If you sit at a computer for any length of time, you'll notice it. A slow wearing away at your wrists, to the point they feel like your hands are connected to you with broken glass. That's what happened to me.
Grammarly said I have written 37 million words since 2018. Shocked, I looked down at my hands, thankfully, but also noticed a pinch in my right wrist. It's not sitting on my Carpio 2.0!
A Carpio 2.0, by Deltahub, is simply a wrist rest that moves with your hand (Fig. 1). It slides with your mouse, sliding back and forth between keyboard and whatever. It made a big impact on me.
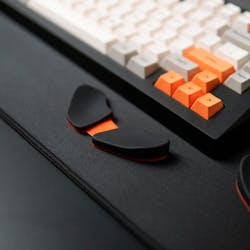
It was a little awkward to get used to at first, but is now essential.
Before the Carpio 2.0, I actually had a bit of an emergency. After a long writing and engineering crunch, the next morning I noticed an intense pain in my right wrist. I literally couldn't move it without excruciating pain, and assumed it was due to using my mouse. I'd known about Carpio for some time, so I took a desperate chance on it. I couldn't be happier that I did. It wasn't long before the pain in the wrist was much better. It truly comes down to ergonomics.
As an added bonus, it's quite freeing if you play any sort of PC game.

I also bought the Carpio riser 3D models to tweak the positioning a little. In addition, I modified their models to get it even more tuned in.
I use just one for my mouse, but two could be utilized with the keyboard. However, read the next entry first.
Both of Your Hands: The Cleave
Approximately 37 million words. I typed those out on a lot of different keyboards. Membrane to mechanical. Straight bar to curved ergonomic to split design.
From my experience, a standard straight bar keyboard will destroy one or both of your wrists over time. Ergonomics is key. All major HMI companies offer some sort of ergonomic board. But I've found that most miss the mark. They're a cheap design with no real thought behind them.
The Cleave from Truly Ergonomic Keyboard (Fig. 2) has been a miracle for me. Wrist pain from typing alone is at a minimum. Using it at first was strange, but now I see every single other keyboard as inferior.
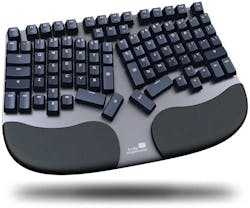
You might be saying, "Hey, this is kind of like a split keyboard. Like an Ergodox EZ.” Yes, it is. However, the key layout on The Cleave is a step above every board out there. I have an Ergodox among other boards, I can attest. Use The Cleave for a few months, and you'll see, too.
You’ll probably be asking, "What about mechanical key switches and aspects thereof?" The Cleave is a mechanical switch keyboard. Hot swappable, meaning easy to replace individual switches. Best of all, though, is that they’re optical switches. This means no metal-to-metal contact is necessary. Use a mechanical keyboard with corroded metal switches, and you see why optical is "the way." You could also pour a soda on The Cleave and be MOSTLY fine.
The Cleave has a full row of "F" keys? The Cleave is optical? The Cleave is backlit? The Cleave moved the Windows key away from accidental tapping? The Cleave has built-in wrist rests that are top-notch? The Cleave feels too natural? Is The Cleave too perfect?
I have four of these with all of the switch types they offer. Personally, I've gone with linear red switches. I get the appeal of clicky and tactile switches, but speed is all I want now.
My only wish would be to get very light linear switches — 35g instead of 45g.
Your Hands Again, They’re this Important: Computer Mouse
I bet you were expecting a computer mouse suggestion from me. I actually don't have one.
I suggest getting a few. Different styles and shapes to break the RSI from setting in.
I do lots of CAD and design work along with writing. So, I tend to stick with a mouse as the main interface. A few colleagues of mine use trackballs and touchpads for their HMI. But nothing beats the speed of a mouse in CAD. I have a few mice:
- A Logitech g9x (my main). The shell changeability breaks the RSI hold. I printed my own shell for it once. But the plastic feel just isn't there with PLA+. Maybe ABS is the way to go?
- A Logitech G502x (too clicky with a cheap scroll wheel).
- An original MS Optical Pro (now with ancient sticky plastic). Yes, I know I can fix that, but I'm too lazy.
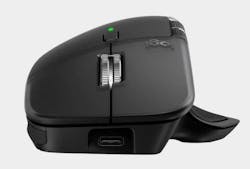
What I think would be an excellent mouse for ergonomics, a combination of a flat and vertical mouse, is the Logitech MX Master 4 (Fig. 3). I say go with the Master 4 over previous models due to the improved shape and size.
Still, get a few different varieties. Whatever works for you.
Your Body: Standing Desk – UPLIFT Desk
An adjustable standing desk shouldn't be optional in your work/play life.
Change of pace, being tired of sitting all day, ergonomics, and health reasons are all factors for having one. But I believe having the ability to stand and work on a project is as important as sitting to work on it. Almost every Halloween project I've worked on, for example, was done partially on my desk in both configurations. It's dynamic. I love it.
Why a standing desk at all? A phrase I saw all too often pops into mind, "Have it and not need it, than need it and not have it."
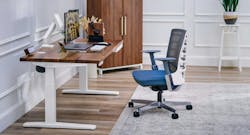
There are quite a few options in this area. But one, in my opinion, is a clear winner. UPLIFT Desk is the gold standard standing desk company. Their desk frames, the part that moves, are the most solid and stable I've ever used (Fig. 4). I've tried frames from Monoprice, Flexispot, and a few others, and UPLIFT Desk is noticeably better.
How it worked for me: I would go to UPLIFT Desk's site to see what I wanted. Then I went to other sites to see what I could afford. I ended up spending far too much on different platforms. Ultimately, I gave up getting just good enough, and I went premium.
If you go to UPLIFT Desk's site, you might feel shocked by the quality of the actual desktop materials. Butcher block tops are my favorite type. Configure one in the link above, you'll see.
So, when I got that UPLIFT Desk standing desk frame, did I get a walnut butcher block top? Nope… I’ve had a $35 IKEA table top sitting on an UPLIFT Desk desk frame for a decade. I did, however, splurge for a bamboo top not too long ago. I just took the original Uplift frame and expanded it for the new, longer top. Bolted it on and was off to the races (Fig. 5).

However, I plan on taking this concept to a work table in my shop. An adjustable work surface on wheels is the holy grail of building for me.
So, stay tuned to Electronic Design for my complete review of this idea.
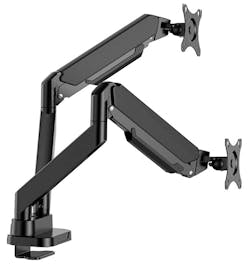
Your Posture, Your Space: Monitors and Monitor Arms
Monitors are subjective and personal, I feel. Do I need three 5k OLED screens in a panoramic setup? No. Do, I want that? Yes. This is all up to you and your budget. I used to use 3x screens. Lately, I prefer just one.
Still, your monitor(s) setup on your desk should be universal. You need a monitor arm. Adjustability, customization, and ideal ergonomics are what you get with monitor arms. I use a two-in-one solution from ErgoAV.
The arm is great for very light screens to heavy ones. I have both types. My main screen is a very lightweight, 27-in. 2k version, which was changed from a heavy one recently. The arm can move that screen very high, all the way down to the surface of my desk. Again, complete adjustment is essential for posture and ergonomics.
At first, I had two screens on this arm setup. Being able to move the screen around and tilt it to a vertical (portrait) position is great for research and coding.
However, I replaced the second screen with a drawing tablet. I did this so I could pull the drawing tablet screen (an XP-PEN one) in from under my main screen. It completely freed up most of my desk space this way.
And, yes, I used to be the put-a-monitor-on-a-stack-of-old-books person. I was once a hardcore CRT person, too, for longer than you think. Hey, nothing beats the latency and color depth of a CRT, am I right? Six square feet of CRT monitor to a flat panel on an arm was a game-changer.
The ErgoAV arm (Fig. 6) has passthrough USB-3, USB-C, audio, and HDMI. I don't use any of that, but I should — particularly the USB; you'll see why I didn't in a later entry below.
If the ErgoAV had a modern DisplayPort connector, I would be over the moon. Maybe two or three of them for my screens.
Your Organization: USB Hub for Your Desk
You need a USB hub sitting on your desk. The more ports, the better. The ErgoAV passthrough just isn't the same.
Instead, I use a Sabrent 10-port USB-3 hub with individual on/off switches (Fig. 7). With the individual switches, I can select what mouse I want to use, or easily turn off a dev board for the inevitable need to disconnect while working on it.

I'm a huge fan of Sabrent for its M2 drives, so I had to go with the company’s hub. My only wish for a future USB desk hub from them would be USB-C connectivity for things like external screens, high-speed drives, etc.
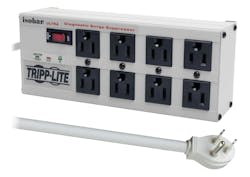
Your Necessities: Desktop Power Strip
The desktop upgrades don't stop. You need a power strip on your desk. It's essential for developing. Maybe I want to power a Raspberry Pi, maybe I need to run a 3D printer, perhaps I need some lighting for videos, maybe I want to have a turntable on my desk. Whatever the reason, I need a power strip up here.
The one requirement I have is that it sits there and doesn't twist, doesn't move much, is stable, and maybe heavy.
I just happened to already have a few "Tripp Lite" heavy-duty "Isobar" power strips. In particular, this 8-outlet one that sits on top of my desk (Fig. 8). I considered bolting it down, but it never moves because it's too heavy. I currently have my monitors, two video lights, a high-wattage charger, a rechargeable battery charger, and a power supply for an Arduino plugged in. I still have one spot left!
But that’s my choice for a desk. For a workbench, I would suggest one of the long power strips like this one.
If you get a standing desk, look at Uplift's accessories. You'll find some power strips that clamp on or bolt on. I think these are cool. I could see a use for several clamp-on spots around the desk.
Your State of Mind: Preserving Your Digital Life
I've had several OS and disk drive failures in my life. As I mentioned in last year's list, I lost a lot of data. The one that really sticks with me is the loss of all data related to my college senior design project. So long ago. So much lost.
More recently, I've taken data redundancy very seriously. In fact, I've had several hard drive failures and OS corruption. But I bounced back the same day thanks to the amount of data redundancy I have. I've adopted the 3-2-1 rule:
- 3 copies of your data.
- 2 copies local in different formats.
- 1 copy remote.
For the 2 local copies
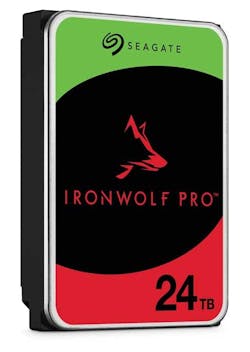
I do have 2 local copies in the form of two RAID-configured hard drives. When I've had drive failures, I just pop out the failed drive and replace it. I've been safe for decades now.
My suggestion here is a set of drives from Seagate (Fig. 9). The Ironwolf Pro series is designed for continuous use. I've been running on several for quite some time.
This isn’t exactly what they mean when they say two different formats for the local copies, even though it’s literally 2 copies.
For the real second local copy in a different format, I have essential data backed up on Blu-ray and DVD. However, that’s not enough space. I need about 12 TB for all my work and personal files.
I’m considering tape. Yes, a tape backup. The price per terabyte is cheap, but the drives are not: $100 45-TB cartridges, but $6,000 drives use them. The verdict is still out on this one. Normally, I would say, "Can you put a price on your family pictures and video?" However, apparently I have. $6k is more than any car I’ve ever owned.
I was also considering USB flash drives, but they’re flaky. I considered SD cards, too. How about I just put 12 TB onto 8,333,334 3.5-in. floppies? Thanks, HowManyFloppyDisks.com. All of these options are cheaper than tape's initial cost, but the main issue is the ease of backing up. It seems 1 TB is common in both USB and SD technologies. Still, I would have to manually replace the individual memory devices at least 12 times. Perhaps there’s a way to make the 12 devices look like 1… hmm…
The 1 remote copy
Now for the remote copy. Technically, they suggest it be a cold storage on a remote site. Instead, I’ve gone with a remote cloud storage option. Out of all the cloud storage options I've tried, I found Backblaze is the cheapest, easiest to use, with far more options in the backup process (Fig. 10). It has unlimited storage space for a flat fee. Setup is straightforward — fire and forget.

If you do choose this remote backup option, please consider using my personal referral code linked here. Thanks! I appreciate it.
Even better, Backblaze publishes periodic reports on its drive failures. This is an option for your local hard-drive selection. Choose a drive from their list with the lowest failure rates. That’s where I picked the Seagate drives mentioned earlier. I do notice that after drive reports are published, the specific drives they mention tend to be a bit more expensive from retailers. Very suspect.
Guess what… Last year, I found a DVD with all my college senior design project files! Lost for years and years. Apparently, I was thinking two copies local even back then. Where was it? On the bottom of a box of random school papers, in a paper CD sleeve. I wrote on the DVD with a Sharpie. I was surprised the Sharpie ink didn't ruin the disc.
Body and mind addressed. Now it's time to revisit some items from last year's list.
Revisiting Important Tools
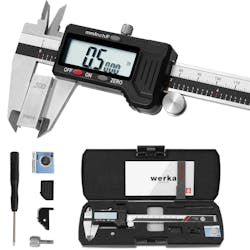
Calipers Again
In the last gift guide, I said under no circumstances ever get a digital caliper. I’ve since changed my mind, slightly. I still have a mechanical one, but recently obtained a digital one and find it's really accurate, and I can switch between metric and imperial with ease.
I'm surprised how often that needs to be done. Isn't this why that billion-dollar Mars rover crashed? A problem with measurement conversions? So, keep track!
I was building parts for Halloween costumes for my son and I, and had STLs in both measurement types that needed redesigning.
I got a Werka digital caliper and really like it (Fig. 11). One downside is that it uses those LR44 batteries. Not the most common. So, get a bunch of them. Like I said before, you'll have to replace the battery more than you think. The caliper does have an auto shutoff, so maybe it won't be too bad.
Cheap Multimeters Again
I'm still advocating the cheap multimeter from Harbor Freight on the last holiday list (Fig. 12). But I have a suggestion: Cut the probe ends off some of them. No reason why. That's it. Next.
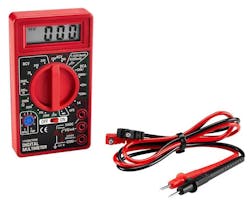
Just kidding. Cut the ends off and solder on some project wires. It's so useful for doing breadboard or dev board (with pins) project troubleshooting. Also great for hands-free monitoring.
You should have dozens of these. So, no loss to mod a few of them.
The limitations of the cheap multimeters are very apparent if you’re trying to watch fast voltage changes on some pins. Perhaps next year I'll have found an upgrade, but still a cheap multimeter that can track fast voltage changes.
3D Printers Again
I can't count the number of things that I 3D printed this past year. Needed a pen holder for my desk, so I printed one. Needed a smartphone holder for video calls, so I printed one. Needed a way to hold tiny Arduino boards while soldering other parts to it, so I printed that. Needed some stands to display art and pictures, so I printed them. Needed Halloween costume parts to become Team Fortress 2 characters with my son; I printed those, too.
It's the gift that keeps on giving.
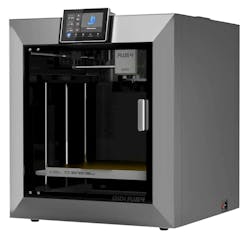
This year, I am going all in on recommending QIDI 3D printers. The price-to-quality ratio is unmatched.
I am recommending the QIDI Plus4 (Fig. 13). The print envelope is large.
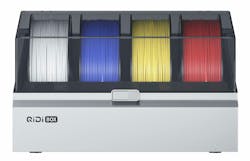
It's also compatible with the "QIDI BOX," a multicolor upgrade for the platform (Fig. 14). Printing large prints in four colors, yes please!
OK, truth time… I don't have a QIDI Plus4. I just want one. I've never used the QIDI BOX, but it seems awesome.
I have one of their older and smaller printers, and it's performed for years without fail. I didn't even have to re-level the bed in all this time. I've only printed in PLA+ (upgraded PLA comes in many names), which is a little gentler on the components. That may have saved me. I needed to print a helmet for the Team Fortress 2 "Soldier" character, but it had to be printed in two halves. However, if I had the Plus4, I could have printed the helmet with a whole sizing head under it.
Oh, QIDI Plus4, I dream of you.
What is Split3r?
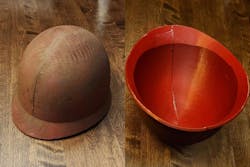
For all of us tiny 3D printer people, I have one final item for you to consider: Split3r (Fig. 15). It's a way to split large 3D models into smaller chunks, but it automatically adds tenons on the sides needed to lock all of the parts together.

I backed the Kickstarter project for it originally. But now it's available to everyone!
For the record, I used Split3r on the Team Fortress 2 helmet halves mentioned above. It made lining up and connecting the two parts so easy. However, the epoxy spillover was not my best work (Fig. 16).
That's it for my immediate — Black Friday/Cyber Monday — personal gift guide. A little greed is okay, especially if it improves your life in healthy, productive ways, as it has for me.
If you get anything from this list or have some alternatives in mind, send me a message or add a comment on this post. I'd love to hear your opinion on any of it.
Happy upgrading!
About the Author

Cabe Atwell
Technology Editor, Electronic Design
Cabe is a Technology Editor for Electronic Design.
Engineer, Machinist, Cartoonist, Maker, Writer. A graduate Electrical Engineer actively plying his expertise in the industry and at his company, Gunhead. When not designing/building, he creates a steady torrent of projects and content in the media world. Many of his projects and articles are online at element14 & SolidSmack, industry-focused work at EETimes & EDN, and offbeat articles at Make Magazine. Currently, you can find him hosting webinars and contributing to Electronic Design and Machine Design.
Cabe is an electrical engineer, design consultant and author with 25 years’ experience. His most recent book is “Essential 555 IC: Design, Configure, and Create Clever Circuits”
Cabe writes the Engineering Life & Engineering on Friday blog on Electronic Design.
See Cabe's cartoons & comic strips here.
Comment About the Article
To join the conversation, and become an exclusive member of Electronic Design, create an account today!

Leaders relevant to this article: