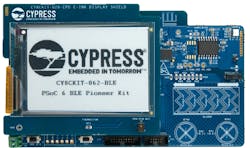
Cypress Semiconductor’s PSoC 6 BLE Pioneer Kit (Fig. 1) is based on the latest dual-core PSoC 6. The PSoC 6 comes equipped with an Arm Cortex-M4 and a Cortex-M0+—the former is the application processor, while the latter manages the Bluetooth support. Most developers will be programming the Cortex-M4.
1. Cypress Semiconductor’s PSoC 6 BLE Pioneer Kit has a dual-core PSoC6 with Bluetooth Low Energy support. The 2.7-in. E-ink display shield plugs into the Arduino-compatible socket.
The system integrates 1 MB of flash and 288 kB of SRAM. The PSoC architecture features configurable analog and digital blocks; this incarnation has seven programmable analog blocks and 56 programmable digital blocks. These can be linked to any 78 GPIO pins. The main board includes sensors that work with the CapSense support. The processor also has access to a 512-Mb NOR serial flash.
The kit’s 2.7-in. E-ink display shield plugs into the Arduino Uno-compatible socket. There’s a PDM-PCM digital microphone on the display board. In addition, the shield comes with a three-axis accelerometer and three-axis gyroscope.
Getting Started
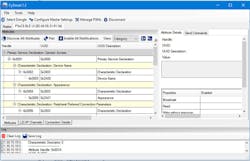
The first thing to do is download the software from the Cypress forums. The software package includes PSoC Creator IDE along with the peripheral driver library (PDL) and support for the CySmart USB Bluetooth dongle that’s also included in the kit. The CySmart software (Fig. 2) is used to connect wirelessly to the main board when both are plugged into a USB port.
2. The CySmart application controls the CySmart Bluetooth dongle that links the kit’s Bluetooth support to the PC.
The main board comes with the CE220167_BLE_UI project installed; it’s easy to connect to the CySmart dongle since the software comes up advertising itself. The USB interface allows the system to be reprogrammed using PSoC Creator.
The CySmart software can query the board using the Bluetooth connection. It also will send commands and provide a log of the interaction with the main board. This simply shows that the Bluetooth connection and board are working.
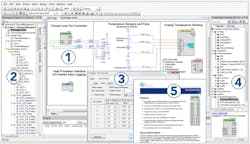
I had to fire up PSoc Creator (Fig. 3) to install a more interesting project. PSoC Creator has a drag-and-drop configuration system that’s integrated with software development in addition to a tool for creating and configuring the firmware peripherals in the system. Components can be configured using the graphical interface; the library maintains hundreds of these components. Details for each component are easily accessible, and most are configured using dialog boxes within PSoC Creator. Designs can be exported to third-party firmware development tools like IAR’s Embedded Workbench.
3. PSoC Creator has a drag-and-drop configuration system (1) that is integrated with software development (2). Components can be configured using the graphical interface (3) and there are hundreds of components (4) in the library. Details for each component (5) are easily accessible.
Creating a new project from existing examples is as easy as selecting from a list of PSoC 6 MCU Code Examples. The actual projects are maintained online and downloaded on demand. This provides up-to-date projects and quickens installation, and unused projects don’t take up space on disk. The projects bring in all related peripherals, software, and documentation. App notes for each project can be downloaded as PDF files. I tried out a couple of them, such as the temperature measurement application that allows measurements to be sent via Bluetooth and controlling the E-ink display.
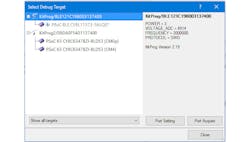
It’s necessary to configure the debug interface to work with the Cortex-M4. Actually, three PSoC platforms are connected to the system (Fig. 4). The PSoC 6 has the Cortex-M0+ (CM0p) and Cortex-M4 (CM4) listed under the KitProg2 interface.
4. Three PSoC platforms were actually connected to the system that PSoC Creator could program. The PSoC 6 has the Cortex-M0+ (CM0p) and Cortex-M4 (CM4) under the KitProg2 interface.
After Initial Setup…
It’s relatively easy to get everything up, as it is to program the system. The numerous examples highlight customization of using the programmable analog and digital blocks with standard peripherals. Adding standard peripherals is easy, too, but care needs to be taken in terms of connectivity since the board has devices already connected to various pins, including the Arduino Uno socket.
Getting a handle on PSoC Creator, the PSoC 6 architecture, and analyzing the sample applications is a major undertaking. This is due to the system’s complexity and functionality. Incremental modification of example applications and using the debugger are a good way to start. The PSoC 6 architecture is extremely rich, and it’s possible to create new peripherals. However, it requires expertise over and above the general configuration and programming performed by most developers.
The kit also has some interesting features worth examining. For example, the kit’s base board includes a Cypress EZ-PD CCG3 power-management system. It comes with a Type-C connection that provides power and a USB connection. And it can charge a 3.7-V lithium-ion polymer battery. Furthermore, the EZ-PD CCG3 will deliver power to a Type-C peripheral such as a cell phone if power is provided an external source.
Another interesting feature is a supercap that can be used in low-power applications. On top of that, there’s a power connection that enables the use of a lithium-polymer (LiPo) battery. A LiPo battery charger is built-in.
Overall, the kit provides a quick and easy way to check out a PSoC 6 and Cypress’s Bluetooth Low Energy (BLE) support. The expansion options are numerous and the software support is top-notch. The board design files are available, as is all of the source code. It’s a development platform that I can readily recommend.
To see an out-of-box demo of the Pioneer kit, click on the image below:
About the Author
William G. Wong
Senior Content Director - Electronic Design and Microwaves & RF
I am Editor of Electronic Design focusing on embedded, software, and systems. As Senior Content Director, I also manage Microwaves & RF and I work with a great team of editors to provide engineers, programmers, developers and technical managers with interesting and useful articles and videos on a regular basis. Check out our free newsletters to see the latest content.
You can send press releases for new products for possible coverage on the website. I am also interested in receiving contributed articles for publishing on our website. Use our template and send to me along with a signed release form.
Check out my blog, AltEmbedded on Electronic Design, as well as his latest articles on this site that are listed below.
You can visit my social media via these links:
- AltEmbedded on Electronic Design
- Bill Wong on Facebook
- @AltEmbedded on Twitter
- Bill Wong on LinkedIn
I earned a Bachelor of Electrical Engineering at the Georgia Institute of Technology and a Masters in Computer Science from Rutgers University. I still do a bit of programming using everything from C and C++ to Rust and Ada/SPARK. I do a bit of PHP programming for Drupal websites. I have posted a few Drupal modules.
I still get a hand on software and electronic hardware. Some of this can be found on our Kit Close-Up video series. You can also see me on many of our TechXchange Talk videos. I am interested in a range of projects from robotics to artificial intelligence.
