Occasionally I get my hands on some interesting hardware. It gives me the chance to check out the latest software tools that you use most of the time. This time around it’s the IoT Starter Kit (Fig. 1) from the AT&T IoT Marketplace, courtesy of Avnet and STMicroelectronics, as well as the Gumstix AeroCore 2 for NVIDIA Jetson (Fig. 2). These are very different animals, but do have one thing in common: They’re designed to get you started quickly.
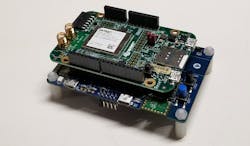
1. The AT&T Starter Kit (Gen 2) module includes a 4G LTE interface plus a set of on-board sensors.
I actually started work on the earlier version of the AT&T IoT Starter Kit, which is a two-board set including an Arduino-compatible 4G LTE shield and STM32L4 Discovery IoT node with BLE, NFC, sub-GHz RF, and 802.11b/g/n WiFi support. It also has an array of sensors including temperature, humidity, 3-axis accelerometer, 3-axis magnetometer, 3-axis gyro, a time-of-flight and gesture sensor, and microphone. It incorporates a Pmod connector and runs Arm mbed.
The Gen 2 version is a single module with a quad core Cortex-A7 running embedded Linux. It has GPS on-board plus a Pmod connector for attaching additional sensors. The module features a connector on the bottom, allowing it to plug into a carrier board.
Both come bundled with a six-month IoT data plan that can be extended. Setting up the accounts takes longer than getting the software up and running. They hook into AT&T’s cloud services that feature a range of management tools and analytic services. The platforms are supported by AT&T’s M2X Data Service and Flow Designer. They are a great way to get started with an LTE-based IoT solution.
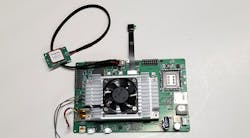
2. I attached the GPS module and a 4K video camera to the Gumstix AeroCore 2 for the NVIDIA Jetson, which is also host to my Jetson TX2 module.
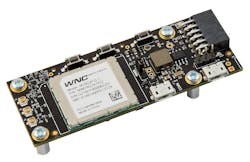
The Gumstix carrier board is designed for drones and robots but it can be used for other applications where bringing the compute power of the Jetson TX1 or TX2 to bear can be invaluable. This nice thing about the Jetson is that the applications that ran on the development board work well with the Gumstix platform. The major change is the peripheral complement. The Jetson module only has some built-in peripherals like the wireless support. The carrier board also has a socket for an LTE radio along with a SIM card socket.
The Gumstix board supports up to four cameras. I have that many, but started with just one that matches my Jetson TX2 development board. Getting applications to work was simply a matter of configuring the drivers. The NVIDIA module has its own storage in addition to a multicore ARM-compatible processor and an NVIDIA GPU.
I did not exercise all of the features of the Gumstix board yet, but I did plug in the GPS module. Having it on a cable allows the antenna to be positioned away from the processing module. I left the fan on because I still occasionally use the module on the development board. I didn’t use it with the Gumstix board, although it runs a little slower to keep cool. I plan on utilizing it with the iRobot Create 2 vacuum turned robot.
Gumstix has created a number of videos covering their new board, such as the one below. They also have additional documentation and blogs on their website.
The challenge is board placement, since the camera placement can be an issue and my board mounting is for a Raspberry Pi. The Gumstix board would fit into the carrier, although it would rattle around.
One thing I have yet to do is exercise STMicroelectronics' STM32F427 on the Gumstix board. This controls the servo headers and some peripherals. It includes the open-source, PX4 flight controller autopilot software. This comes in handy for aircraft, but can also be used for other robots. I’m hoping the techs at Gumstix get it working with the Create 2 before I need it.

About the Author

William G. Wong
Senior Content Director - Electronic Design and Microwaves & RF
I am Editor of Electronic Design focusing on embedded, software, and systems. As Senior Content Director, I also manage Microwaves & RF and I work with a great team of editors to provide engineers, programmers, developers and technical managers with interesting and useful articles and videos on a regular basis. Check out our free newsletters to see the latest content.
You can send press releases for new products for possible coverage on the website. I am also interested in receiving contributed articles for publishing on our website. Use our template and send to me along with a signed release form.
Check out my blog, AltEmbedded on Electronic Design, as well as his latest articles on this site that are listed below.
You can visit my social media via these links:
- AltEmbedded on Electronic Design
- Bill Wong on Facebook
- @AltEmbedded on Twitter
- Bill Wong on LinkedIn
I earned a Bachelor of Electrical Engineering at the Georgia Institute of Technology and a Masters in Computer Science from Rutgers University. I still do a bit of programming using everything from C and C++ to Rust and Ada/SPARK. I do a bit of PHP programming for Drupal websites. I have posted a few Drupal modules.
I still get a hand on software and electronic hardware. Some of this can be found on our Kit Close-Up video series. You can also see me on many of our TechXchange Talk videos. I am interested in a range of projects from robotics to artificial intelligence.
Comment About the Article
To join the conversation, and become an exclusive member of Electronic Design, create an account today!

Leaders relevant to this article: