The batteries leaked in my laser pointer. They had swollen to the point where I could not get them out. I clamped the laser pointer in my trusty Wilton vise and drilled out the batteries with a large drill (Fig. 1).
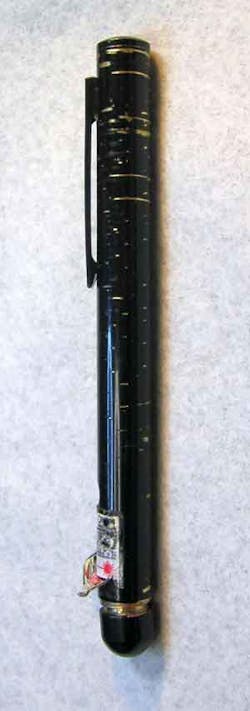
1. The batteries leaked in this laser pointer. The scratches in the brass housing are from the vise I held it in while drilling out the batteries.
Just like the Flip video camera I previously wrote about, the Duracell batteries had leaked (Fig. 2).
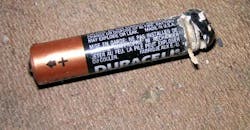
2. Here was one of the leaky battery cells. The other one came out in two pieces after drilling it out. This is the tenth time I’ve had leaky batteries ruin a product.
Like that camera, I did not keep this laser pointer in a hot garage or car trunk. It was in my laptop backpack. I will confess that I had not touched the laser pointer for years. Thing is, the pointer works by applying battery power to a current-regulating circuit, so it’s not like there was any load whatsoever on the batteries to make them discharge to the point of leaking.
Battery Bonanza
I have taken my own advice from the Flip video camera article and bought dozens of AA and AAA NiMH rechargeable cells. Be sure to buy the button-top style unless you need tabs. A fellow engineer commented that both these and the primary alkaline cells sold by Digi-Key are much less prone to leakage. I bought both Panasonic and Fujitsu brand cells. They were not the highest capacity, but rather the ones rated for the most discharge cycles.
Most of my AA and AAA battery cells are used in low-load products like this pointer, remote controls, and wireless mice. When I added up all the cells in the house, I ended up buying around $200 of battery cells. That made the $8 shipping pretty negligible. As we have come to expect from Digi-Key, the package was on my doorstep in a couple days.
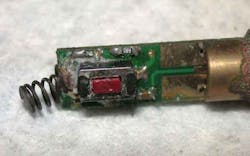
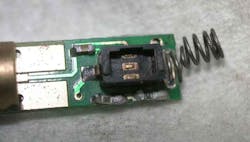
3. The laser diode housing and PCB was pressed into the laser pointer tube. The red tact switch picked up a plunger activated by a small button on the side of the pointer.
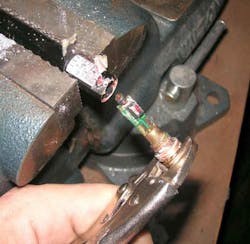
Getting the first battery cell out was easy. Drilling out the second battery was a bit of a challenge. I knew if I drilled right through it, I would ruin the laser circuitry. I selected a drill bit that would dig into the outside casing of the battery, but not so large it would swedge the casing into the pointer housing, making it irretrievable. After getting the second cell out, in two pieces no less, I saw that it did not provide access to any screws or disassembly method. Instead, the head of the laser pointer is pressed into the tube, so I yanked it out with a pair of Vise-Grips (Fig. 3).
Time to Test
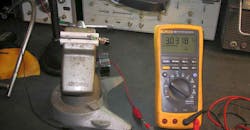
I wanted to verify the circuit still worked, so I connected a 3-V power supply to the laser pointer printed circuit board (PCB), bypassing the switch (Fig. 4). The laser still worked and had a bright red spot. Since the laser did not work when I applied power before the small tact switch, the corrosion from the leaking batteries had gotten inside the switch (Fig. 5).
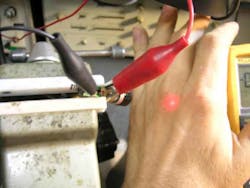
4. The laser worked when I bypassed the switch and applied 3 V.
5. Battery corrosion surrounded the tact switch, so it was logical it had ruined the switch.
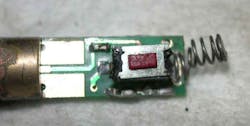
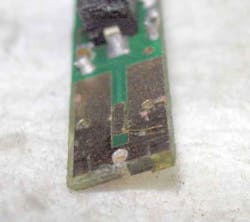
The backside of the PCB had a couple of TO-23 transistors on it (Fig. 6). This and a few passive components made the current-source power supply for the laser diode. I carefully pried off the switch cover, and the corroded interior confirmed why the switch was not working (Fig. 7).
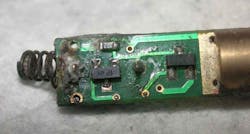
6. The solder side of the PCB had a couple of transistors and a resistor, all surface-mount. Since I stored the pointer pointing down, the corrosion from the batteries wept far into the PCB assembly.
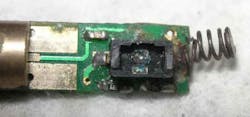
7. With the cover pried off the tact switch, and the red button and spring contact removed, you can see the severely corroded contacts.
I should mention that any modern electronics project or repair requires a fully equipped lab (Fig. 8). Here is my lab setup, with the Bausch and Lomb StereoZoom 4 microscope allowing me to see what I am doing. If you have the means, I highly recommend picking one up. You can also see a headband magnifier I got from Digi-Key at the far right. Note the Teflon jaws on the Panavise. The circular fluorescent lamp missing its magnifier was a flea-market purchase for a few dollars. It can work when you don’t need the dual-gooseneck illuminator for the microscope.
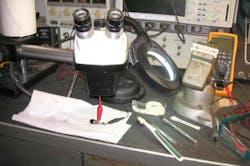
8. Working on this tiny stuff requires a microscope or at least a head-band magnifier. You can’t fix what you can’t see.
Having six old Harley Sportsters, I built a home-made bead blasting cabinet (Fig. 9). It was just the thing to clean up that corroded switch and PCB. After just a momentary blast, maybe 100 ms, the switch and PCB were pristine and free of corrosion (Fig. 10).
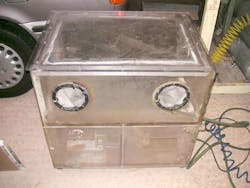
9. A homemade bead-blasting cabinet served to clean the PCB. It has ultra-fine glass beads that are usually used to clean Harley parts.
10. After a momentary blast in the cabinet, the tact switch is bright and clean. It also cleaned the solder balls on the resistors and capacitors, while also abrading off the markings.
An equally satisfying victory was when I used my Metcal soldering iron to re-melt the tabs that held the switch cover on (Fig. 11). The switch worked. The laser shone brightly. All was well with the world.
11. With the aid of the microscope, I was able to melt the tabs on the tact switch housing to hold it all together.
“What If I Did This….”
Then, in a phenomenon I call OCD-overshoot, I just had to keep messing with it. You might notice a bit of corrosion at the base of the spring used to contact the battery cell. I did. I took the working PCB back to the bead blaster. Now instead of shooting a short blast down on the switch housing, I gave a blast pointed from the side, toward the base of the spring. That shot beads under pressure into the brass housing for the laser diode. It not only clogged the channel with glass beads, it etched the plastic surface of the laser diode. This meant the focus was lost, and instead of a nice crisp beam, all I got was a dim red glow, barely visible.
Sigh. I had improved things until it broke. I couldn’t be happy with success, I had to keep grinding away until I screwed it up. After all, I built that bead blaster, and wanted any reason to use it even more. And why be happy with a short blast when I could really blow off every little bit of corrosion?
12. A second blast in the bead cabinet ruined the laser diode, abrading the lens, despite it being at the end of a long narrow channel. Pulling the brass housing off the PCB revealed the business end of the laser pointer, with the diode broken off and only a bond wire remaining as a final salute to my stupidity.
I ripped off the brass housing to reveal the end of the PCB where the laser diode was mounted (Fig. 12). You can just see a thin gold bond wire used to make a connection to the die. The rest of it is lost, collateral damage to the bead blast. It caused great pain to toss the laser pointer into the garbage. Experience is a cruel teacher, it gives the test before the lesson. But I learned my lesson: When it is fixed, stop messing with it, and move on to the next project. I hope you have better luck with your endeavors.

About the Author

Paul Rako
Creative Director
Paul Rako is a creative director for Rako Studios. After attending GMI (now Kettering University) and the University of Michigan, he worked as an auto engineer in Detroit. He moved to Silicon Valley to start an engineering consulting company. After his share of startups and contract work, he became an apps engineer at National Semiconductor and a marketing maven at Analog Devices and Atmel. He also had a five-year stint at EDN magazine on the analog beat. His interests include politics, philosophy, motorcycles, and making music and videos. He has six Harley Sportsters, a studio full of musical instruments, a complete laboratory, and a video set at Tranquility Base, his home office in Sun City Center Florida.
Comment About the Article
To join the conversation, and become an exclusive member of Electronic Design, create an account today!

Leaders relevant to this article: