
This article is part of the TechXchange: Cybersecurity
Download this article in PDF format.
In an increasingly connected world, online devices now reach into every facet of modern life. From automated cars to smartwatches to the phone in your pocket, the myriad of form factors and value of the data contained in these devices has never been greater. Thus, the need to prioritize security in IoT-style embedded systems has rarely been more urgent.
Ensuring security in an embedded system necessarily involves Secure Boot as the first step. Here, we take a look at the variables, and the best practice for doing so, with a focus on one of the most popular processors in electronics—the i.MX6.
What is Secure Boot?
The process of Secure Boot is where your OS boot images and code are authenticated against the hardware before they’re allowed to be used in the actual boot process. The hardware is set up beforehand in such a way that it only authenticates code generated using security credentials you trust. In short, it ensures that the boot and OS software is the intended manufacturer version and hasn’t been tampered with by any malicious party or process.
In any single-use device, Secure Boot is an essential tool. This is especially the case in devices such as e-readers, which often integrate the i.MX6 processor (the i.MX6 Solo and DualLite have an integrated E-Ink display controller, for example). The i.MX6 is intended for specifically reading e-books, rather than general computing. Having a locked-down Linux environment at boot is particularly useful in such applications.
Other situations, such as an Android phone, may be less black-and-white. Using Secure Boot would restrict end users from running custom ROMs, for example, which might be seen as a desirable situation for a manufacturer, or a major compromise. However, a good time to use Secure Boot is any case where you don’t want another party to load an operating system or a different bootloader onto your device.
For other integrated systems, such as IP cameras running Linux, you would be well-advised to use Secure Boot. That’s because any malicious boot code or operating-system software could lead to a situation where the device is made part of a botnet, or the cameras’ output is compromised.
Deep Dive: The i.MX6 Secure Boot Process
On the i.MX6, after creating your boot images, Secure Boot can be utilized once you generate a set of secure keys against an SSL certificate generated for this purpose (Fig. 1).
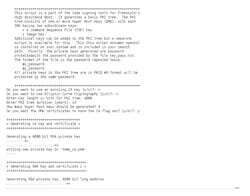
1. This shows the Secure Boot certificate generation process.
Those keys are subsequently used in the generation of a secure set of commands that are compiled and appended to the boot image using vendor (Freescale, now NXP) -supplied tools. In the next stage, the processor will then take your first-stage bootloader and authenticate the certificate data generated by the Secure Boot compilation tools using your certificates.
Assuming that the key data in your boot image precisely matches the key data stored in the secure storage in the processor, the secure commands will be executed. Then it will check a cryptographic hash of your images to make sure they match what the secure commands say they should be. If they do match, the processor will load and execute your boot image.
Once this process passes through the CPU's internal bootloader, you can still call into the Secure Boot library from your bootloader code. This allows you to load your operating-system image and authenticate it in the same way that the CPU bootloader authenticates your software bootloader.
By the end of this process, the OS has booted in a verified secure environment. You know that it’s legitimate because every stage has passed the test of being authenticated against the key hashes in the processor.
Setting up Secure Boot
Root keys are generated from your SSL certificate, hashed, and burned into the CPU in a one-time programmable process. Once that key has been burned into the processor, it can’t be changed, which is one of the reasons it’s secure.
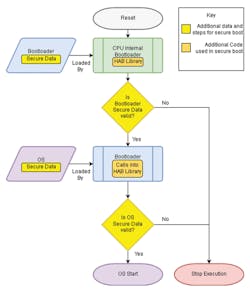
2. The Secure Boot process starts with a secret key, which is used to verify that the boot code is valid.
Your boot images are signed against this key, and the data generated from this signing process is combined with your image (Fig. 2). The processor checks your image key with its key and, if those match, it checks the image against the key that was just matched with the processor. If that matches, the image is executed. This takes you up the chain, from CPU bootloader to a normal bootloader to the operating system. There are other flavors of Secure Boot, but for simplicity we’re sticking with the i.MX6 example.
The tools used in this process are the Code Signing Tools (CST) and MFGTool (Fig. 3), which are provided by NXP for Secure Boot and general development purposes. The CST suite is used to create signing certificates, as well as both the Secure Boot data added to OS/Bootloader code and the secure data burned into the CPU fuses.
MFGTool is used to load and execute code onto an i.MX6 device, in the Secure Boot case, to write the secure data to the CPU in production.
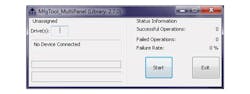
3. The MFGTool is used to download the signed boot code to a device.
Hardware Leverage
The i.MX6 hardware suite has a number of specialized security mechanisms, the most important being the one-time fuses used in burning your key. Once they’re blown, they can’t be unblown—after you’ve burned your key, your key hash is permanent. Multiple keys can be combined into one key hash, too. Therefore, you can revoke a key if it’s been compromised, an essential requirement for embedded systems.
Another function of system security is the CPU internal bootloader, a static piece of code that has also been security tested. This is a key foundation in maintaining a chain of security up to the operating-system level.
In addition, the i.MX6 has a hardware cryptographic algorithm accelerator. Algorithms such as AES hashing, Triple DES hashing, SHA1, and SHA256 can be accelerated by the processor, which speeds secure operations considerably.
Secure Boot: The Challenges
The most obvious challenge in Secure Boot is in maintaining your own security. If your keys leak, someone can sign that code against the key that’s in the processor. Thus, in addition to the hardware, you need to keep your process secure.
A second key challenge is that a processor configured to only boot securely will not boot unless it has an image that’s properly signed. So, any errors that occur when burning your hash into the processor may result in a processor that can no longer run code because the burnt-in hash doesn’t match—effectively a useless processor.
Once the processor is secured, there’s no way to load unsecured code to it. It will only allow you to securely load from storage, such as SD or NAND flash, or other modes of loading software into the processor (USB image loading).
Therefore, the steps for preparing your hardware and the processor must be kept secure. You must also ensure that your boot loader is prepared for this as well. This means that your bootloader must call into the Secure Boot library on the processor in order to authenticate the next stage in the boot chain.
Not Full Lockdown!
While Secure Boot is a valuable step in securing your system, implementing it on the i.MX6 doesn’t lock the entire system down—only the OS software. As a result, someone might write some Linux malware that runs on top of the OS, and if it loads successfully, it could compromise the system.
Secure Boot Authentication
It’s possible to authenticate parts of the file system and other code, if you require full security. The Secure Boot process on the i.MX6 works on the principle of specific chunks of memory having a specific cryptographic hash and associated signing information. This makes it possible to load the OS's root file system and other key files into a fixed point in memory, along with the correct set of secure commands. This would allow you to authenticate other parts of the system if necessary.
Best Practice for Secure Boot on the i.MX6
1. Make your process secure
Implement a good overall security practice. Once you’ve decided you need to go down the route of Secure Boot, make sure the surrounding processes are on the same page, too. Leaking your keys out of the production environment undermines the point.
2. Keep your encryption strong
Make sure your algorithms are up to date and fit for purpose. It’s possible to create very weak keys; Secure Boot on the i.MX6 supports some older, now regarded as compromised, combinations.
3. Check your code
For Secure Boot to mean anything, the rest of your code in the bootloader, OS, and other software also has to be properly written for Secure Boot, and not have security flaws.
In addition, each stage of the boot process must check the next before executing it. If this isn’t done or only part-way done, there’s much less scope for calling the process secure.
4. Authenticate everywhere
For genuine security, authenticate as much of the code you want to load as possible, and ensure that it follows the practices established for the libraries. Secure Boot can only check the signing, and any signed image can be considered secure by the processor.
Make sure that each separate part of the code you’ve written is called into the Secure Boot library in the processor. You call into that library to continue authenticating your images because most i.MX6 boards have a multi-stage boot process—there’s a CPU internal boot loader that loads an SPL which, in turn, loads a full boot loader that loads the OS. Each of these jumps needs to be authenticated by the preceding step to be considered secure.
5. Confirm the process is authenticating correctly
It’s essential to ensure that your code is genuinely performing the Secure Boot, and is authenticating the next step of code in order to maintain security.
The most common bootloader used for the i.MX6 is U-Boot, which supports Secure Boot on the i.MX6. It needs to be configured, but it’s a lot easier. Furthermore, there are fewer ways to get it wrong when a lot of the work has already been done for you.
Read more articles at the TechXchange: Cybersecurity
References:
http://www.bytesnap.co.uk/secure-boot-imx6-part-1/

About the Author
Nathan Padoin
Software Developer
Nathan Padoin is an embedded software engineer at ByteSnap Design in the UK. After gaining his computer science degree at the University of Southampton, Nathan joined ByteSnap Design, an electronics design consultancy specializing in embedded-systems development encompassing hardware and software design. Nathan works on embedded systems projects—control systems and multimedia devices, amongst others—across several markets, such as industrial and AI. His expertise includes Linux and Android BSP development.
Comment About the Article
To join the conversation, and become an exclusive member of Electronic Design, create an account today!

Leaders relevant to this article: