Putting Protocols into Practice with RecordFlux

Members can download this article in PDF format.
What you’ll learn:
- The simple steps toward developing a complex message specification using RecordFlux.
- How to implement this specification in Ada/SPARK application code.
Translating a message specification from paper to code can be complicated and prone to error. In the best-case scenario, all aspects of the message specification are implemented in program code, housed in structures, with potentially thousands of lines of defensive coding and/or exception handling to catch potential errors. Each received message could become complex if conditions, case statements or subprograms may be required to verify message validity.
Not only is this process cumbersome for the application developer, it also makes maintaining the application difficult to nearly impossible. And testing and debugging... even worse! Tracing through thousands of lines of code and conditions is a time-consuming process. Any errors that slip through could expose the entire application to severe security issues as well (think cyber exploits).
Enter RecordFlux. RecordFlux is a powerful tool for implementing secure message specifications. The power in this tool lies in its ability to generate provable SPARK code from a specification and simplify the process of translating a protocol from paper to code. How does this translate to the application developer?
The message specification is isolated to a RecordFlux file. Using the RecordFlux language, developers can strictly define message flow, constraints, bounds, and so forth—all things that, if embedded into a normal application, could take up thousands of lines with defensive coding practices. The SPARK code generated from the RecordFlux file, when implemented in code, ensures that the message implementation in the application is provable, safe, and secure.
In this article, we’ll walk through the initial process of implementing a RecordFlux specification for a real-world protocol. We’ll also describe the process of putting the RecordFlux-generated code to work in a simple set of client/server applications. This provides a full picture of how to carry something from “protocol description” to “application reality.”
The Protocol (and Example Scope)
The protocol I chose to implement for this example is the Datagram Congestion Control Protocol (DCCP). I’ll only lightly describe the protocol here, since the focus for this discussion is RecordFlux, not the minutiae of DCCP.
DCCP is a transport layer protocol that provides a reliable means to negotiate connections (from connection to closure) and offers built-in congestion control mechanisms. It operates similarly to TCP but doesn’t guarantee that messages will be delivered in order.
DCCP isn’t a widely used protocol, but can offer advantages for streaming media, gaming, telemetry, and other applications in which timing (low latency) and reliability are highly valued. RFC 4340 outlines the basic protocol structure as composed of a DCCP Header followed by an Application Data Area (Fig. 1).

The DCCP Header consists of three potential “sections”:
Generic Header: Present in each message
Additional Fields: May be present (depends on packet type)
Options: May be present (presence inferred by a field in the Generic Header)
RFC 4340 (and other related RFCs) go into great detail about the protocol and the various types of packets, optional fields, and other dynamic fields (those that change in size depending on the message). It would be quite an endeavor to implement DCCP in its entirety, so for the purposes of this example, a “starter DCCP” specification (Fig. 2) was implemented based on the common message set utilized during the handshake process.

Creating the Specification
Fixed-Size Fields
As identified above, the DCCP Header is composed of three distinctive “sections.” Each “section” consists of various message fields. The Generic Header (Fig. 3), for example, contains a core set of fields that are present in every message.

The code snippet (Fig. 4) is fairly straightforward: A message with the name Packet is defined. Each field is identified, followed by its type.

For example, the following defines a field, Source_Port, of type Port_Type:
Source_Port : Port_Type
Port_Type is defined previously in the specification file as having a size of 16 bits with a value range of 0 to 65,535:
type Port_Type is range 0 .. 2 ** 16 - 1 with Size => 16;
This is pretty simple, and thus far, not very complicated. However, not all fields in the message are always present at the same fixed size.
Conditional Field Checks
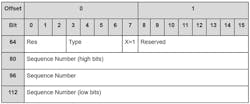
The DCCP Generic Header contains a field (X) to indicate Extended Sequence Numbers. Depending on the value of this field (0 or 1), the next field in the header will either be a 24-bit Sequence Number or a 48-bit Sequence Number (preceded by a Reserved field for padding). For a message where X = 1, the next message fields would appear as shown (Fig. 5).
To implement this in RecordFlux, conditions must be added directly to the field. In the DCCP specification file, a check for the value of X looks like this:
--  value for X determines whether to use long or short sequence
X : Ext_Seq_Type
   then Res_8
      if X = EXTENDED
   then Sequence_Number_Short
      if X = NOT_EXTENDED;
In the above snippet, each then represents what the next field would be should the if condition below be satisfied. As shown, we can see that if X = EXTENDED (1), then the next field is Res_8 (which corresponds to the Reserved field in the previous table).
The DCCP specification features various field conditions. These are used to define what constitutes a valid message, which, for DCCP, can range from a small number of fields (12 bytes in size) to many fields and bytes of data (upwards of 1020 bytes in size).
Dynamically Defining Field Sizes
For many message protocols, it’s not uncommon to store some value to indicate the message length, or a portion of the message length, in a field. DCCP is no different, and the Generic Header contains a Data_Offset field that contains a value to indicate “the offset from the start of the packet's DCCP header to the start of its application data area, in 32-bit words.”
What this means, in terms of writing a specification, is that it’s impossible to define certain parts of the message with a fixed size. In this instance, it’s essential to know the value in the Data_Offset field, and be able to use that to define the size of the Options field.
A “simple” example of this can be seen in the following portion of the DCCP specification:
Service_Code : Service_Code_Type
   then Options
      with Size => (Data_Offset * 32) - (Service_Code'Last - Message'First + 1)
         if (Data_Offset * 32) > Service_Code'Last - Message'First + 1
   then Data
         if (Data_Offset * 32) = Service_Code'Last - Message'First + 1;
The above snippet shows the Service_Code field and the conditions applied to it. If the value of Data_Offset * 32 is greater than the last bit of the Service_Code field, then the next field in the message is Options, with a Size that equals the number of bits left in the Data_Offset * 32 value after subtracting out the entirety of the message from the first bit of the message (Message’First) to the last bit of Service_Code.
If the value of Data_Offset * 32 equals the current point in the message (i.e., the last bit of Service_Code), then the message contains no Options and can proceed to the next section, Data.
Sequences/Repeated Fields
The Options section of the DCCP specification is a bit different. There can be zero to many Options in a message. From the previous section, we’ve already seen how the Size of Options can be dynamically defined based on the Data_Offset value. It’s not much more complicated to represent the “many” options in a message.
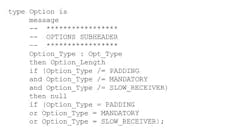
Since Options are a unique and large portion of the DCCP message, for the purposes of this spec, a separate Option message was defined. Just as the Packet message was defined previously, an Option message is defined in the spec. Figure 6 shows a small snippet of this message (showing an Option_Type field and the conditionals that follow for next field selection).
To tie the Option message to the Packet message, first, a sequence of Options must be defined:
type Options is sequence of Option;Think of a sequence as an iterative list. It can store multiple Option elements in a list titled Options. With the Options sequence defined, this field can now be added to the Packet message. It simply appears as the following (remember, the Size for this field is already pre-defined from previous message field conditionals):
Options : OptionsThat’s it! This is all that’s required on the specification side to define Options, which can vary in quantity and size.
Data as an Opaque Type
Data is the last field identified in the Packet message, and it’s defined as an Opaque type. This is worth mentioning here due to the unique nature of Opaque types.
In this case, Opaque was used as a type for Data because it’s a “don’t care” value. It’s a sequence of bytes, but categorizing them or qualifying them wasn’t important for the message itself. However, it’s worth noting that translation and refinement of this data can be performed at the application level, as desired.
Another thing to note about Opaque types is that they’re an arbitrary size unless defined otherwise. Since Data is the last field in the DCCP Packet message, and since it’s an Opaque type, the contents of this field will fill the entire remaining allocated message space.
Implementing the Specification in an Application
We’ve walked through the key points of the DCCP specification. These should be helpful in understanding the nuances of crafting a specification from scratch. However, it’s worth exploring how to take that specification and turn it into a working set of application code.
Generate the SPARK Code
The RecordFlux file (dccp.rflx) provides one consolidated piece of information to outline the message specification. The RecordFlux generate command can turn that specification into a set of SPARK code that can be used with any Ada or SPARK application. To generate code files for the RecordFlux specification, locate the message spec and enter the following into the terminal window:
rflx generate -d ./generated/ dccp.rflxFor the above, ./generated is the output directory for the generated code files and dccp.rflx is the spec file.
Using the SPARK Code
Using the generated SPARK code is simple. It can be ported into any Ada/SPARK codebase. For the purposes of this example set, my project files feature a generated folder that contains all of the RecordFlux-generated files. This separates the files from my source code, but still allows us to view them within the GNAT Studio environment.
To use these files within the scope of my source, we simply add the necessary references. At a minimum, for example, we know that my source code needs the following with clauses:
with RFLX.DCCP.Packet;
with RFLX.DCCP.Option;
with RFLX.DCCP.Options;
This will allow us to access the generated types and functions associated with my original specification file.
The DCCP Client Application
We’ve created a very basic DCCP Client application that sends a small set of messages using a simple local socket connection. The main intent of this application is to demonstrate how to set values in the various message fields. It’s fairly straightforward, but there are a few nuances worth noting.
Field Order
The order in which fields are set matters (note: this is a current RecordFlux technical limitation, as of version 0.11.1, and will be addressed in a future release). The fields must be set in the order that they’re outlined in the message specification. This is due to the DCCP message specification structure. Many fields throughout the DCCP specification have dependencies; as mentioned previously, these dependencies are used to define what constitutes a valid message.
For example, we know that the message specification defines X before any values for a sequence number field (which is either long or short, depending on the value of X). We also know that, if X = NOT_EXTENDED, then the next field in the message is Sequence_Number_Short. This can be seen in the following snippet from the specification file (dccp.rflx):
--  value for X determines whether to use long or short sequence
X : Ext_Seq_Type
   then Res_8
      if X = EXTENDED
   then Sequence_Number_Short
      if X = NOT_EXTENDED;

--  Only 'present' if X = EXTENDED
Res_8 : Reserved_8_Type;
Our application code would see an error in the following case, because (1) we are attempting to set a field that hasn’t yet been defined within the message (Sequence_Number_Short is defined after X) and (2) Sequence_Number_Short doesn’t exist in a message where X = EXTENDED (per the previous specification snippet):
DCCP.Packet.Set_Sequence_Number_Short (Context, 16#01_23_34#);
DCCP.Packet.Set_X (Context, DCCP.EXTENDED);
Of course, the user can automatically check for such problems so that they’re not encountered at runtime. SPARK’s gnatprove tool* will detect and report the violated precondition:
medium: precondition might fail, cannot prove Valid_Predecessor (Ctx, Fld)
   40 |      DCCP.Packet.Set_Sequence_Number_Short (Context, 16#01_23_34#);
      |      ~~~~~~~~~~~^~~~~~~~~~~~~~~~~~~~~~~~~~~~~~~~~~~~~~~
  in inlined expression function body at rflx-dccp-packet.ads:2950
The correct way to set the Sequence_Number_Short field, which will be proven correct by SPARK, would be:
DCCP.Packet.Set_X (Context, DCCP.NOT_EXTENDED);
DCCP.Packet.Set_Sequence_Number_Short (Context, 16#01_23_34#);
*Note: gnatprove can be an extremely beneficial tool during development, as it can be used to identify areas in code where problems may arise. All RecordFlux-generated code is SPARK-compliant, so extending the end-user application to be the same via usage of SPARK and gnatprove ensures a high level of reliability.
Switching to Options
Remember how, in the RecordFlux specification file, Options was a special type (a sequence)? It was fairly straightforward to spec out. It’s a little trickier to access on the application side.
The default “operating context” for the application is the DCCP.Packet context view. This is set when DCCP.Packet.Initialize is called. It works great when setting different fields present in the header, but Options is a unique case. To access the Options sequence, first, the “context” must switch to Options. To do this, first, a context must be defined:
Options_Array_Context : DCCP.Options.Context;Then, when it is time to “switch” to this context in the application code, the following must be called:
DCCP.Packet.Switch_To_Options (Context, Options_Array_Context);That’s what must be done for the sequence. But remember, a sequence has elements. A context must be defined for that level as well:
Opt_Context : DCCP.Option.Context;Then, in the application code, after DCCP.Packet.Switch_To_Options has been called, the following must be called to “switch” to the element in Options:
DCCP.Options.Switch (Options_Array_Context, Opt_Context);At this point, users have access to an element in Options, and all fields for that element can be set. In the following case, an option type that includes three fields is set:
--  CCID3_RCV_RATE
--  1 byte
DCCP.Option.Set_Option_Type (Opt_Context, DCCP.CCID3_RCV_RATE);
--  1 byte
DCCP.Option.Set_Option_Length (Opt_Context, 6);
--  4 bytes
DCCP.Option.Set_Receive_Rate (Opt_Context, 0);
After setting all fields related to this Option, DCCP.Options.Update must be called to update that specific element in the sequence:
DCCP.Options.Update (Options_Array_Context, Opt_Context);After all desired options are populated in a sequence, a call to DCCP.Packet.Update_Options can be made to signify completion of the sequence.
To “give back” the DCCP.Packet “operating context,” one final piece of code must be put into place after the options sequence. If this isn’t in place, a Constraint Error would be raised upon program execution. Note that this type of error could be avoided entirely by using gnatprove during development, which would flag Context as a potential “resource or memory leak” (and therefore give the developer the necessary cue to add in this missing piece:
DCCP.Packet.Take_Buffer (Context, Buffer);Running the DCCP Client Application
The remainder of the application is fairly self-explanatory, so our last remarks involve running the code itself. Upon program execution, the following will be displayed in the console:
Start DCCP REQUEST Send...Finished!
Start DCCP RESPONSE Send...Finished!
Start DCCP ACK Send...Finished!
Start DCCP DATA ACK Send...Finished!
Start DCCP DATA Send...Finished!
Start DCCP CLOSE Send...Finished!
Start DCCP RESET Send...Finished!
As a standalone application, that’s not really significant. But when paired with the server application, we can see that the messages defined from the client code and transmitted are, indeed, parsed and displayed on the server side. So, on to the DCCP Server!
The DCCP Server Application
The DCCP Server application was designed specifically to listen to the messages sent by the client application. Both applications could be modified for an expanded message set, but again, this is for demonstration purposes, so the sample set is small. The intent of this application is simply to demonstrate how to access the various fields from a received message.
Just as there were nuances to writing messages within the client application code, there are nuances for reading messages within the server application code.
Field Order
Unlike in the client application, fields in the server application can be accessed in any order, assuming the fields are valid (per terms of the specification) and present for that particular message.
In other words, dccp.rflx defines, in order:
Source_Port : Port_Type;
Destination_Port : Port_Type;
Calling "get" for fields in this order is permissible, because they are valid and present in the specification:
DCCP.Packet.Get_Packet_Type (Ctx)
DCCP.Packet.Get_Source_Port (Ctx);
Note that "get" returns a value, and therefore would not appear exactly as above in code.
Switching to Options
We saw earlier that there’s a specific process for writing to the Options area of a message. There’s also a specific process for reading the Options area of a message.
As the message receiver, the DCCP server must traverse the sequence of options found within the message. This works in a similar fashion to traversing the sequence from the client side.
The default “operating context” for the application is the DCCP.Packet context view. This is set when DCCP.Packet.Initialize is called. To access the Options sequence, first, the “context” must switch to Options. To do this, first, a context must be defined for this:
Options_Sequence_Context : DCCP.Options.Context;Then, when it's time to “switch” to this context in the application code, the following must be called:
DCCP.Packet.Switch_To_Options (Ctx, Options_Sequence_Context);Next comes a part unique to the server-side code. The server has a sequence of Options, but to access a list of potentially varying sizes (because all Options are not the same size, and can occupy one or many bytes), a loop must be implemented. The following while loop must be “established” to traverse the sequence:
while DCCP.Options.Has_Element (Options_Sequence_Context) loopThis loop checks to see if the Options sequence contains any elements. If so, entry into the loop continues.
The first line of application code within the while loop is a call to DCCP.Packet.Switch_To_Options, which “switches” the context to the next element in Options:
DCCP.Options.Switch (Options_Array_Context, Opt_Context);Next, a call to DCCP.Option.Verify_Message must be made for that particular Option element. This is essential to set the correct message state for reading data for that element:
DCCP.Option.Verify_Message(Option_Element_Context);Finally, Option element information can be retrieved using the various DCCP.Option.Get_x calls necessary for that particular option type. As an example, for the PADDING option, which is one byte in size, the following line of code prints the type to the console:
Ada.Text_IO.Put_Line ("Option Type: " & DCCP.Opt_Type'Image(Opt_Type_Field));In the DCCP server application, the while loop that traverses the Options sequence contains a case statement that retrieves specific information for an Option based on the type identified via a call to DCCP.Option.Get_Option_Type.
At the end of each loop iteration, a call to DCCP.Options.Update is made. This is essential to move the Sequence to the next Option element:
DCCP.Options.Update(Options_Sequence_Context, Option_Element_Context);After the entire Options sequence has been traversed, the while loop exits. A call to DCCP.Packet.Update_Options must be made to signify completion of sequence access.
Retrieving Data
One last nuance to the server application is the retrieval of “data.” In the original dccp.rflx specification, Data was identified as an Opaque field with a fixed size. Because we know the size is 256 bytes, a Buffer of 256 bytes must be created to contain the data from the message.
Each procedure that features a “data” call declares a Data buffer for this purpose:
Data : RFLX_Types.Bytes := (1 .. 256 => 0);Retrieving the data from the message is otherwise just like retrieving information for any other field:
DCCP.Packet.Get_Data(Ctx, Data);That’s it! There’s no special magic to retrieving data.
Running the DCCP Server Application
The DCCP Server is a “quiet” application. It listens for data from the DCCP Client and only prints information to the console when that information is received. For both applications to “talk” and “listen” as expected:
- Run the DCCP Server
- Run the DCCP Client
Once the client is running and prints out message status information, the server should start receiving the same respective information and print the results to the console.
Next Steps
As stated previously, the DCCP specification (dccp.rflx) provided with this sample set of code is incomplete. Additional conditionals could be added for integrity, and many, many additional packet types and option types could be implemented.
The DCCP Client and Server applications are also designed for a very specific use. They could, however, be modified to do the following, as an expanded exercise:
- The Client could be modified to load DCCP sample packets in RAW format and transmit these to the Server. This would provide a “playback” capability for real-world data.
- Both applications could be modified to implement a message handshaking protocol (i.e., the Server could generate a response to the Client and vice versa).
Conclusion
Implementing a vast and verbose protocol using RecordFlux is simple, but does come with some challenges, as demonstrated in this article. However, I’m a novice in both the areas of network protocols and RecordFlux, and I was able to generate a robust specification and set of applications fairly quickly.
We were very impressed by how much integrity can be built into the RecordFlux specification file while maintaining a concise file with good readability. By this, we mean that it’s easy to intuit the message layout and constraints at a glance.
Even if reading the specification file becomes challenging, the fact that a message graph can be generated is fantastic. It provides an excellent visual aid for traversing real-world message packets against the specification.
With all of this in mind, readers find themselves faced with the challenge of implementing a binary message set or protocol. In particular, if the application code is written in Ada/SPARK, consider using RecordFlux.
About the Author
Dana Miller
Head of Field Engineering, AdaCore
Dana Miller is the Head of Field Engineering at AdaCore. She leads a team of engineers that provides customer education and support for the Ada and SPARK languages, and for the AdaCore ecosystem. In a previous life, she worked in embedded software development and systems engineering for rotary aircraft.
Comment About the Article
To join the conversation, and become an exclusive member of Electronic Design, create an account today!

Leaders relevant to this article: