
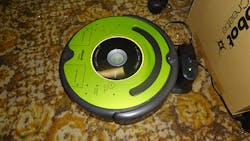
1. Here is my iRobot Create 2 taking a breaking sucking down electrons from its charger.
It started back when I tried out Gumstix’s Turtlecore carrier for the original iRobot Create (see “TurtleCore Tacks Cortex-A8 On To iRobot Create”). It was quite a chore getting the Robot Operating System (ROS) running because very few people had done it before. ROS runs on a wide range of robotic platforms and supports a variety of sensors (see “Using The PrimeSense 3D Sensor With ROS”). Working with this platform was challenging but it worked, to a degree.
Enter the iRobot’s Create 2 (Fig. 1). This new platform uses the latest iRobot base and provides better controls and modularity. The tray that was handy with the original version is gone, but there is a good bit of space under/inside if you can make a custom carrier using a 3D printer. This is essentially a stock machine with the brush assembly removed. The interface connector is on top, so most projects have a cable running from underneath to the top of the unit.
Luckily I didn’t have to start from scratch this time around. William Phan has put together a series of articles that step you through the process. I built one that was close to this, but using a different battery pack I had on hand.
We both used a Gumstix Overo Airstorm-P because it has Bluetooth and WiFi support. The Gumstix Tobi carrier module provides USB and Ethernet connectors. The USB allows use of the USB cable that comes with the Create 2 and to connect to the USB camera used in the project. The latter requires a USB hub, as the Tobi only exposes one USB connector.
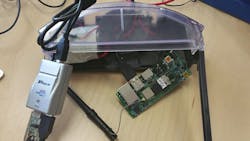
2. The Overo Airstorm-P module is on the Tobi expansion board.
A Sony Dual Shock 3 controller is linked to the system via Bluetooth. Some ROS applications support this type of controller, thereby providing a way to control the system remotely.
One reason there are five parts is that much of the system has to be built. ROS is handy, but not necessarily as plug-and-play as you might like. On the plus side, it is a lot easier than the first time I tried to get ROS running on a Gumstix module. The articles do an excellent job of providing and explaining the steps involved. It is still not a project that a complete newbie might try, but if you are comfortable with Linux and the compiler tools, then the process should be easy.
The end result is a tele-operated robot that can be expanded. It is a nice way to start since you will know what works and where features can be added. There is a good bit of headroom on the module so more advanced applications can be built.
One thing you may want to do after running through the tutorial is replace the battery pack with a power connection from the Create 2 itself. This means building a custom cable or adding an adapter cable that pulls power from the Create 2 connector. The challenge is the power coming from the Create 2 cannot be plugged directly into other devices. A dc-dc converter is normally needed. On the plus side, the Create 2 can automatically dock and charge itself and the battery level tracking support is part of the system already.
About the Author
William Wong Blog
Senior Content Director
Bill's latest articles are listed on this author page, William G. Wong.
The latest blogs have been moved to alt.embedded on Electronic Design.
Bill Wong covers Digital, Embedded, Systems and Software topics at Electronic Design. He writes a number of columns, including Lab Bench and alt.embedded, plus Bill's Workbench hands-on column. Bill is a Georgia Tech alumni with a B.S in Electrical Engineering and a master's degree in computer science for Rutgers, The State University of New Jersey.
He has written a dozen books and was the first Director of PC Labs at PC Magazine. He has worked in the computer and publication industry for almost 40 years and has been with Electronic Design since 2000. He helps run the Mercer Science and Engineering Fair in Mercer County, NJ.
- Check out more articles by Bill Wong on Electronic Design
- Bill Wong on Facebook
- @AltEmbedded on Twitter
Comment About the Article
To join the conversation, and become an exclusive member of Electronic Design, create an account today!

Leaders relevant to this article: