DC-DC Converter Design Considerations For Wearable Devices
For wearable devices, DC-DC converters must provide high conversion efficiency and also minimize board space for the associated power control IC, inductor, capacitors, and resistors. In addition, these “micro” DC-DC converters must minimize the number of components, so their board layout is simple and minimum noise occurs, which reduces development time.
Torex has specialized in the design of micro DC-DC converter products that include a switching regulator with a single output that integrates the control IC and inductor. The package structure is determined by considering the product specifications, IC, inductor, heat generation (heat dissipation), and other characteristics. Following are the techniques employed by Torex to optimize performance of micro DC-DC converters.
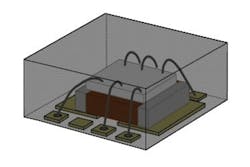
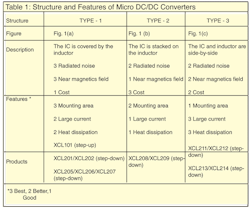
The first design consideration is the package structure that has three possible options. Each option has advantages and disadvantages, as shown in Table 1. Fig. 1 shows the circuit structure.
Designed For Noise Reduction
Obtaining full performance from electronic components, whether or not the design achieves noise reduction, is an important concern in circuit design. However, even though the power circuit is a source of noise, component selection comes last. No matter how high the performance of the ICs that are used, it will not be possible to obtain good performance from these components if the power circuit design is bad. Torex takes various measures to reduce noise in micro DC-DC converters, including:
- Using an inductor with minimal flux leakage
- Adjustment of inductor characteristics for the micro DC-DC converter
- Optimization of DC-DC operation
- Deciding pin assignments and structure based on consideration of the current path
EMI (Electromagnetic Interference)
Using measurements of radiated noise and near magnetics field strength, we can describe the extent to which noise characteristics actually differ in a power circuit composed of discrete components (XC9236) and in a micro DC/DC converter (XCL206).
Fig. 2 compares radiated noise in two products, the XC9236B18DMR-G and the XCL206B183AR-G. The XC9236 (black waveform) generates noise over a wide range from 50 MHz to 300 MHz. By contrast, the XCL206 (yellowish green waveform) has a very low noise level. Even at the same operating frequency, the difference is clear. For this reason, the XCL206 (micro DC/DC converter) does not require full implementation of the noise measures that always tend to be put off until later. And on the XCL202 (Freq = 1.2 MHz), which has the same structure as the XCL206, the operating frequency is reduced for even lower noise.
Near Magnetics Field Strength
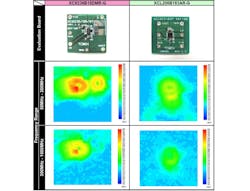
Fig. 3 compares the near magnetics field strength of the XC9236B18DMR-G\uc1\u8221X and the XCL206B183AR-G. The near magnetics field strength does not always correlate directly to the strength of unwanted radiated noise; however, it provides an effective means of identifying noise sources due to high-frequency current flowing in the board.
At a frequency range of 50 MHz to 300 MHz, orange and red appear in a ring-like shape around the XC9236 IC. It can be seen that the strongest noise occurs in the vicinity of the IC’s GND pin. Yellow ring-shaped noise can also be seen at the coil. The coil is a simple shield type (ferrite powder mixed in the resin), and thus it is likely that the noise is due to flux leakage. By contrast, the XCL206 (micro DC-DC converter) has no red or orange, and little noise is generated.
A micro DC-DC converter can be operated without detailed knowledge. A basic knowledge is sufficient to reduce noise and heat generation in circuit components, increase component reliability, and improve product acclaim.
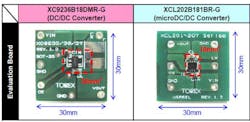
A micro DC-DC converter requires only half the mounting space of a regular DC-DC converter consisting of discrete components, and thus also helps save board cost. The same board space as a linear regulator is sufficient. Fig. 4 compares the mounting space for traditional DC-DC converter and a micro DC-DC converter.
Board Layout Points
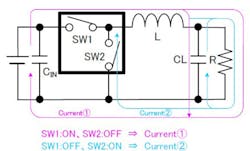
The GND wiring appears simple in the circuit diagram, however, in some cases the actual layout on the printed circuit board is very difficult. It is not a matter of simply making connections, because if the connection positions and board layout are bad, the performance of the entire system will be degraded. For example, a step-down DC/DC converter alternately switches switch 1 (SW1) and switch 2 (SW2) ON/OFF, controlling the currents in order to stabilize the output voltage. The currents that flow when this is done are Current (1) and Current (2) (Fig. 5).
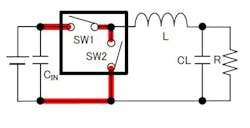
Current only flows in the red wiring shown in Fig. 6 when either Current (1) only or Current (2) only operates. When switch 1 (SW1) and switch 2 (SW2) are switched, the switching current is instantaneously interrupted, causing the L (inductance) component of the wiring to generate an electromotive force.
SW1:ON, SW2:OFF Current 1
SW1:OFF, SW2:ON Current 2
To reduce noise, the red wiring in Fig. 6 must be kept short. Apart from the wiring inside the IC, the input capacitance (CIN) should be placed near the VIN - GND pins of the DC-DC converter and connected with short wiring (Fig. 7). Caution is required because GND in particular will disperse noise throughout the entire system.
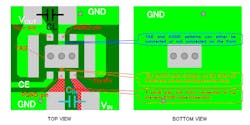
The next explanation refers to the actual test board of the XCL206 (micro DC/DC converter). There is a power GND (PGND) and an analog GND (AGND). In this case, the input capacitance (CIN) can be connected by a short connection to the power GND (PGND) to make the area of the GND pattern (red) where the electromotive force generated is extremely small (Fig. 8).
In terms of pin assignments on the XCL206 test board, the layout of the GND pattern appears to be simply a matter of connecting the power GND (PGND), TAB, and analog GND (AGND) in a line on the front pattern. However, from the perspective of noise, caution is required because the current path changes and the effectiveness of CIN drops, resulting in a negative effect.
About the Author

Sam Davis
Sam Davis was the editor-in-chief of Power Electronics Technology magazine and website that is now part of Electronic Design. He has 18 years experience in electronic engineering design and management, six years in public relations and 25 years as a trade press editor. He holds a BSEE from Case-Western Reserve University, and did graduate work at the same school and UCLA. Sam was the editor for PCIM, the predecessor to Power Electronics Technology, from 1984 to 2004. His engineering experience includes circuit and system design for Litton Systems, Bunker-Ramo, Rocketdyne, and Clevite Corporation.. Design tasks included analog circuits, display systems, power supplies, underwater ordnance systems, and test systems. He also served as a program manager for a Litton Systems Navy program.
Sam is the author of Computer Data Displays, a book published by Prentice-Hall in the U.S. and Japan in 1969. He is also a recipient of the Jesse Neal Award for trade press editorial excellence, and has one patent for naval ship construction that simplifies electronic system integration.
You can also check out his Power Electronics blog.
