Standards based on quantum-mechanical phenomena have performance unmatched by man-made artifacts.
Urban Legend 37: Speeding case thrown out of court because police radar gun had not been calibrated for five years. This defense argument might not work for you although radar-derived evidence has been found unreliable in several well-publicized speeding cases.1
For example, In [New Jersey] State v. Wojtkowiak, 174 N.J. Super, 460 (App. Div. l980), the appeals court held in all future cases the state should adduce evidence as to (1) the specific training and extent of experience of the officer operating the radar, (2) the calibration of the machine was checked by at least two external tuning forks both singly and in combination, and (3) the calibration of the speedometer of the patrol car in cases where the [radar gun] is operating in the moving mode. 2
Conclusions in similar cases question the accuracy of the calibrating tuning forks and refer to the need for certification of calibration documentation for police radar equipment. Of course, these kinds of concerns have long been recognized by the test and measurement community. Anyone who has worked in a calibration-conscious organization is familiar with the colored labels glued to test equipment stating the last and next calibration dates.
A dictionary defines calibration as the act of checking or adjusting, by comparison with a standard, the accuracy of a measuring instrument. For example, police-car speedometers can be calibrated to read the true speed within 1% rather than the 0% to 10% faster reading typical of a passenger car.
Whatever measurement capability is being calibrated, a standard of known accuracy is required. If an instrument's measurement readings agree with standard values to within the instrument's specified accuracy, no adjustment is required. The instrument already is calibrated, and documentation only will confirm its adequate performance. However, if the instrument readings are outside the specified error margin, then adjustment is required. A detailed certificate of calibration may list before and after values but should always state the final values to prove that the specified accuracy has been achieved.
Voltage Standards
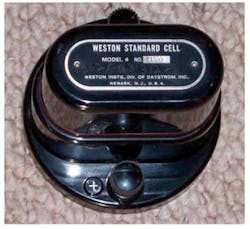
For many years, the most accurate source of a known voltage was the Weston standard cell (Figure 1). Although these devices were commonly found in standards labs throughout the world, they were finicky and delicate at best. The output voltage was nominally 1.01830 V at 20 C and varied slightly with temperature and atmospheric pressure in well-understood ways.
A group of cells was maintained by a lab and each cell periodically measured by comparing it to one of its peers. The value of the reference voltage the lab used in calibration work was based on a statistical combination of the voltages from each of the cells in the group.
Connecting two cells in series opposition meant that just the voltage difference was being measured. Typically, cells differ by no more than a few microvolts, so even using measuring equipment with only kilohm-level input impedance ensured that current was at the nanoamp level. Ideally, no current should be drawn from a standard cell to avoid disturbing its voltage. Modern instruments based on semiconductor technology achieve greater than 100-MΩ input impedance, making routine cell comparison straightforward. The Weston standard cell is a type of artifact standard.The standard volt now is defined in terms of a Josephson junction oscillator, a so-called intrinsic standard. The oscillation frequency of a Josephson junction is given by
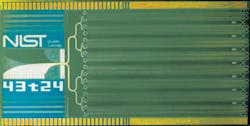
Because voltage and frequency are linearly related, practical primary voltage standards are based on an array of thousands of Josephson junctions running at a lower frequency (Figure 2). The Josephson junction consists of an insulating barrier between two superconductors. The exact composition of the superconductor isn't important, but the entire array must be operated at 4 K to meet the superconducting requirement.
Josephson junction arrays represent the most stable and predictable standard voltage source. In comparisons between similar array-based standards, differences in the nanovolt range were recorded. Just as labs could buy Weston cells, voltage standards based on Josephson junction arrays are commercially available.
Sandia National Laboratories has both a laboratory and a portable array and quotes uncertainty on the 10-V range as 0.017 ppm. This compares with about 0.11 ppm for a group of Weston cells.
A 1985 IEEE paper described an automated DC measuring system that the National Bureau of Standards, now the National Institute of Standards and Technology (NIST), had developed. The author commented, Typically, Kelvin-Varley dividers are used to measure a wide range of voltages in terms of a standard cell. Accuracies better than 1 ppm are only achieved by frequent, time-consuming, manual calibrations of the divider.•
The automated system he described was capable of 0.22-ppm measurement uncertainty, which included 0.11 ppm attributable to the standard cells used to calibrate the system.
Transfer Standards
Transfer standards are secondary standards directly calibrated against a lab's primary standard and then used to calibrate working standards or instruments or transfer an accurate voltage reference to another lab. For example, before NIST could offer the present fast, automated primary calibration service, transfer standards were calibrated against the NIST Josephson junction array and the transfer standards used to calibrate customer standards. Now, NIST offers direct calibration of customer units.
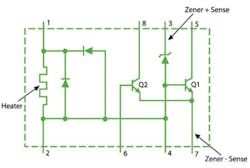
Typically, transfer standards and affordable lab standards are based on zener diodes. One of the more stable units, the Linear Devices LTZ1000, provides a 7-V output with 0.05-ppm/ C temperature drift (Figure 3). This very low figure is achieved by using an on-chip heater to stabilize the operating temperature. Nevertheless, external circuitry drift can easily degrade performance unless carefully designed.
For example, in the Fluke 7000 Series Voltage Standards, the LTZ1000 device has been specially selected and conditioned by Fluke to achieve a 0.7-ppm/year stability. In addition, tantalum nitride (TaN) resistor arrays are used as gain-setting resistors. Within the arrays, many elements having resistance R1 or R2 are interleaved to ensure equal exposure to any thermal gradients. Multiple array packages also are interleaved to achieve the desired gain ratio.
To guarantee the most repeatable performance from a voltage standard, its operating conditions should be changed as little as possible over time. Of course, if a standard is being transported for calibration, its environmental conditions including temperature, humidity, shock and vibration, and atmospheric pressure will change.
Each 7000 Series standard includes 10 AA-size batteries that provide up to 15 h of normal operation at room temperature. Continuing to power a zener reference during transport helps to maintain its stability.
Zener diodes exhibit small, semipermanent shifts in output voltage if subjected to temperature extremes. Large changes in temperature cause mechanical stress that changes the output voltage. The 7000 Series instruments are capable of cycling the zener temperature to remove internal mechanical stress, typically returning the output voltage to within 0.2 ppm of the original value.
Calibrators
A calibrator may provide accurate voltage, current, pressure, or almost any other quantity that instruments can measure. In most cases, stability is at least as important as accuracy because accuracy is only a matter of adjustment to match a known standard. If the calibrator is not stable over time, then frequent adjustment and access to an accurate reference are required, making the calibrator impractical to use.
Critical components used in Krohn-Hite calibrators are selected for their stability, temperature coefficient, and noise characteristics,• said Joe Inglis, the company's sales and marketing manager. Once the best components have been selected, they are aged under power in an oven for an extended period of time to stabilize drift.
In the design of the Model 523 Precision DC Voltage/Current Calibrator, temperature effects were minimized by a two-stage box-in-a-box temperature control,• he explained. The first stage controlled the temperature of the reference. The second stage was to control the temperature of the overall unit.
A calibrator must be more accurate than the equipment it is calibrating, several sources stating a ratio of at least 4:1. To ensure accuracy, calibration should be traceable to NIST primary standards. Omega Engineering's Bob Winkler described the process in detail in a recent white paper:
As NIST defines it, traceability requires the establishment of an unbroken chain of comparisons to stated references. The links in this chain consist of documented comparisons comprising the values and uncertainties of successive measurement results. The values and uncertainties of each measurement in the chain can be traced through intermediate reference standards all the way to the highest reference standard for which traceability is claimed. According to NIST, the term traceable to NIST is shorthand for results of measurements that are traceable to reference standards developed and maintained by NIST.
The provider of NIST-traceable measurements may be NIST itself or another organization. NIST reports that each year more than 800 companies tie their measurement standards to NIST. They may then follow these standards in providing measurement services to their customers, in meeting regulations, and in improving quality assurance. 4
Today's calibrators often combine a number of capabilities in one unit to make a purchase more attractive. While it's true that broader capabilities can address more types of instrument calibration applications, increased functionality only enhances the need to clearly state the calibrator's output uncertainty with time and temperature. Accuracy and stability are analog quantities and fundamental calibrator specifications. Nevertheless, there is a role for modern digital signal processing.
For calibrators designed to generate very precise DC or sinusoidal AC signals, it's necessary to use analog components such as DC voltage references, analog rms converters, and precision resistor networks to achieve the required accuracy and stability,• said Warren Wong, director of engineering for Fluke Precision Measurement.
However, for calibration instruments that support complex precision waveforms, such as those composed of multiple harmonics, DSP ICs can be used in a loop to control the accuracy of the calibrator. For example, Fluke's Model 6100A Electrical Power Standard uses a patented waveform generation technique in which a DSP samples the output in real time, providing feedback to generate the proper complex waveform with extremely accurate harmonic amplitude and phase,• he said.
Agreeing with Mr. Wong's comments about the necessity of precision analog components and references in stable and accurate calibrators was Ron Clarridge, president of Practical Instrument Electronics: The importance of a stable, accurate system reference cannot be overstated. The calibrator can t be more accurate than the references it's given. But if the system reference is compared to the subcircuits, their error contributions can be determined. Software can compensate for these, increasing the overall accuracy of the calibrator. In many cases, this error can be reduced to the magnitude of the most accurate reference component.
Accurate, self-calibrating instrumentation also was the subject of comments made by Adam Fleder, president of TEGAM. The holy grail of self-calibration is the capability to reference the measurement quantity to physical principles in the instrument. This is not always practical or cost-effective. Without [this capability], self-calibration becomes self-verification with a second opinion.
Self-calibration improves the chances that the measurement quantity is within specification but does not ensure it,• he continued. The secondary reference could have drifted. As instruments become more complex, the chances increase that certain conditions could align to produce an inaccurate measurement.
In metrology parlance, internal subcircuit comparisons and self-calibration to a secondary reference are forms of artifact calibration, described in detail in a Fluke application note Artifact Calibration, Theory and Application.• Quite simply, an artifact is an object that represents the quantity being measured. In other words, a voltage transfer standard is an artifact because it provides at least one precise voltage. It has been calibrated against a voltage standard at least one level closer in the traceability chain to the NIST primary standard. Similarly, a gage block that has been measured with an interferometer is a transfer standard, an artifact that can be used to calibrate a mechanical measuring instrument.
In this sense, artifacts always have been used for calibration, but their use has involved many other types of equipment. For voltage calibration, accurate dividers, null indicators, and perhaps other references at different voltages were required in addition to an accurate voltage standard.
Artifact calibration as Fluke has defined the term includes the presence of most if not all of the required auxiliary calibration equipment inside the instrument being calibrated. Internal references are used, but precision dividers and control circuits have been added to measure and correct all of the instrument ranges. Only one external standard or, at most, a few are required for complete instrument calibration.
Earlier, less complete versions of onboard calibration included error correction constants stored in software, for example. However, to establish the values of those constants, the traditional suite of external calibration equipment was required. Calibration was a skilled job, and the time it took added to an instrument's manufacturing cost. Even if automated equipment was used for the initial factory calibration, later recalibration could not easily be done by the user. The expense of periodic recalibration increased an instrument's cost of ownership.
Fluke has implemented artifact calibration on several instruments, and the cited application note reviews data analyzed from measurements made on 100 Type 5700A Calibrators manufactured over a 60-day period. This external verification confirms the integrity of the circuitry used to assign values based on artifact calibration. Consequently, it is only necessary for the customer to reverify the function of the circuitry on a very infrequent basis. With internal references and internal comparison capability, the capacity is there to collect data at the time of artifact calibration .The ability to run internal calibration checks between external calibrations allows monitoring between calibrations and helps to avoid [an instrument being out of calibration without the operator being aware.]
FOR MORE INFORMATION Fluke Precision MeasurementModel 7000 Voltage Standard www.rsleads.com/605ee-179Krohn-HiteModel 523 Precision DC Voltage/Current Calibrator www.rsleads.com/605ee-180Linear TechnologyLTZ1000 Ultra-Precision Reference www.rsleads.com/605ee-181Practical Instrument ElectronicsCalibrators www.rsleads.com/605ee-182TEGAMCalibrators www.rsleads.com/605ee-183Using statistical process control techniques, the collected data can be used to predict long-term accuracy by extrapolating the measured drift rate of a range, for example. This capability can be used to ensure that an instrument always is in calibration, but equally, if drift rates are demonstrated to be very low, can justify much longer intervals between external calibration than otherwise would normally occur.
Summary
One of the foremost 19th century scientists, William Thompson (Lord Kelvin) lived from 1824 to 1907, before any of the companies that contributed to this article existed. The Weston standard cell was invented in 1893 but not accepted as the international voltage standard until 1911. Nevertheless, in addition to his contributions to theories of thermodynamics, electricity, and magnetism, Kelvin had a very clear view of test and measurement.
When you can measure what you are speaking about and express it in numbers, you know something about it; but when you cannot measure it, when you cannot express it in numbers, your knowledge of it is of a meager and unsatisfactory kind; it may be the beginning of knowledge, but you have scarcely, in your thoughts, advanced it to the stage of science.• 5
He was correct in saying that you know something about a quantity that can be numerically expressed. What was not said is that unless the measuring instrument is calibrated to give accurate readings, what you actually know may be less than you think you know.
References
1. Notable Case Law, www.speedingtickethelp.info/information/b-notable-case-law.shtml
2. Speeding and Radar, www.njlaws.com/speeding_&_radar.htm
3. The Standard Volt, http://hyperphysics.phy-astr.gsu.edu/Hbase/solids/squid.html#c5
4. Winkler, B., Calibration Primer, Omega Engineering, 2005.
5. www.cromwell-intl.com/3d/Index.html
About the Author
Voice Your Opinion!
To join the conversation, and become an exclusive member of Electronic Design, create an account today!

Leaders relevant to this article:


