The Advantages of PXI Instrument Drivers
In theory, a solution creator can assemble virtually any type of instrument from a system that provides building-block modules and their associated hardware drivers. In practice, however, it can be quite difficult to create a high-quality instrument because it is necessary to address details that range from the wait time needed for a signal to settle to the calculation of correction factors that include all the modules.
An instrument driver will have the built-in “smarts” necessary to control the modules that make up a multimodule instrument. The overall advantage of an instrument driver can be summed up in one word: simplicity. The simplicity provided can help the user focus on using instrument-level functionality such as creating a signal or making a measurement rather than dealing with the minutiae of controlling each individual module.
Defining Instrument Driver
As a working definition, an instrument driver is a unified set of software routines that controls multiple individual modules as a single instrument. In general, a modular instrument driver is similar to that used with a traditional standalone instrument such as a signal generator. With either a modular or standalone instrument, the driver enables the user to focus on solving a problem—such as characterizing a DUT—rather than spending time configuring multiple modules to function as an instrument.
Instrument drivers let the user reap the benefits of instrument-level functionality and modular-system flexibility, which include the creation of new instruments by adding or subtracting modules. This can eliminate the need to purchase the same components again and again.
Gaining the Advantages of Simplicity
When compared to the process of installing, connecting, and using a collection of modules, working at the instrument level is much easier. Similar to an individual-module driver, though, an instrument driver helps the user realize the flexibility of a modular system by supporting a variety of module configurations.
Two multimodule PXI-based instruments will help illustrate these concepts: a continuous-wave (CW) source and a vector signal generator (VSG). Both include an IVI instrument driver as well as an IVI module driver for the reference module within the CW source or VSG.
Simplifying Installation
Unless individual module drivers are packaged together, it is necessary to download, install, and set up one driver per module. Although this is not always a huge concern, it can be quite tedious. The process is certainly more time-consuming and complex than that required with an instrument driver: After one download and one installation, the instrument is ready to use.
Simplifying Instrument Connection
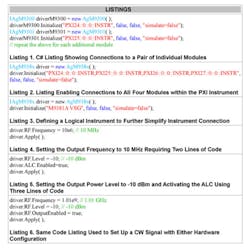
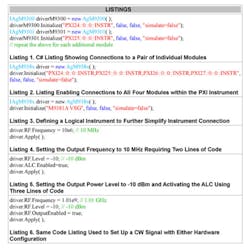
Connecting to an instrument driver is almost as simple as connecting to a module driver. As an example, using C# to connect a module driver might look like Listing 1. In contrast, connecting an instrument driver is simpler, as shown in Listing 2.
These listings help illustrate a recurring instrument vs. module pattern: a single initialization for the instrument driver but multiple initializations for individual module drivers.
There is one important point to remember when connecting to an instrument driver: It is necessary to specify each of the modules that compose the instrument. For repeated use, this can be simplified by defining a logical instrument in the IVI configuration store and using the name of the logical instrument in place of the module addresses, as shown in Listing 3.
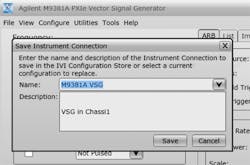
Each of these example instruments provides a soft front panel (SFP) that includes the capability to save the instrument connection to the IVI configuration store associated with an IVI logical name. An example screen is shown in Figure 1.
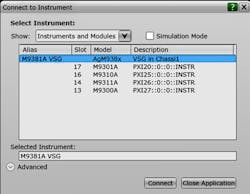
Once the IVI configuration store contains an instrument definition, the SFP connection dialog will offer the logical name as a connection option, as shown in Figure 2. The logical name also is available for use through an IVI initialize call similar to that shown in Listing 3.
Simplifying Instrument Use
Ultimately, the usability of an instrument driver is the main attribute that differentiates it from module drivers. Although module drivers are likely to include an application to control an individual module, the process of combining the functionality of multiple modules is left to the motivated user. In contrast, an instrument driver helps ensure out-of-the-box usability, which often is enhanced by an included application that controls all the modules as an instrument. As a result, the time to first measurement often is faster with an instrument driver.
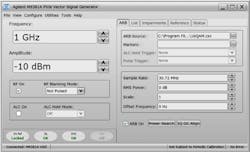
Figure 3 shows an example from the SFP for the PXI VSG and the associated IVI instrument driver. As shown in the screen image, the user can concentrate on the task at hand—setting frequency, power, modulation, and so on—rather than being concerned about the interaction of the modules.
Setting Frequency and Power Level
Programming the modules is another aspect of usability that is simpler with an instrument driver. The setting of frequency and power level in a VSG instrument provides two useful examples. With the instrument driver, setting the frequency consists of just two statements (Listing 4).
To optimize performance, the example IVI driver uses a set-and-apply approach. The reason: The setting of various parameters may require computing correction factors and making changes to the hardware settings. These tasks can be deferred until “Apply()” is called, and this serves to combine overlapping computations and changes into a single step.
Setting the power level is slightly more complicated than setting the frequency because there are more constraints associated with the individual modules within the VSG instrument:
- The source output module has relatively coarse amplitude resolution (for example, 0.25 dB).
- If the automatic level control (ALC) module is enabled, the amplitude resolution is very fine (for example, 0.02 dB).
- When modulation is enabled, the modulator module also has very fine amplitude resolution (for example, 0.02 dB).
In addition, the actual values for the internal attenuator and gain stages vary from stage to stage and module to module. As a result, these must be queried from the module: The actual values were determined during factory calibration and are stored in the module’s nonvolatile memory.
Because the instrument driver automatically takes all this into account, setting the power level can be accomplished in just three statements, as shown in Listing 5.
More Usability
Setting frequency and power level are two examples of simpler cases. Other more complex cases include the following:
- In a vector signal analyzer (VSA), the frequency response of each module must be aggregated to correct the data measured and returned by each digitizer module.
- In almost all instruments, it often is necessary to compute the time it takes for the signal path to reach stability after making a change to the hardware settings (that is, the settling time).
Configuration also depends on the optional capabilities installed in the modules within the instrument. For example, the PXI CW source and VSG can be configured with either a 3-GHz or 6-GHz synthesizer.
Enhancing System Configuration
Instrument drivers also make it easier to realize a key advantage of modular systems, namely the flexibility to purchase only the required hardware functionality. For instance, the example CW source includes three modules: a reference, a synthesizer, and an RF output. Adding a modulator module transforms it into a VSG instrument, and the instrument driver takes care of the underlying complexities of module interaction and configuration.
This is illustrated by Listing 6: The same commands turn on a 1.01-GHz CW signal with a -10 dBm power level for either the CW source or VSG hardware configuration. Accomplishing the same thing with module drivers would require the user to first determine if the modulator module was installed and then adjust the signal path and correction factors accordingly.
Knowing When Not to Use an Instrument Driver
There is a caveat: A typical instrument driver does not provide the same level of flexibility that is possible with individual module drivers. For example, if the user adds a frequency-translation device between the synthesizer and modulator in a VSG, the instrument driver may not have the capability to compute the frequency input to the modulator.
In some cases, the instrument drivers will provide some degree of customization. The IVI driver used in this example provides module-level overrides as well as a fixture-loss table that allows the user to specify frequency and power characteristics that will be included in setup computations. Even with these capabilities, though, the level of customization cannot cover all possible hardware setups.
Wrapping Up
In many applications, an instrument driver will simplify tasks that are more complex with individual module drivers: installation, connection, and usage. For the user, the payoff is less time spent on instrument creation and more time devoted to day-to-day work.
About the Author
Steve Peterson is a software engineer master in the Software and Modular Solutions Division, Electronic Measurements Group at Agilent Technologies. He has worked for Hewlett-Packard and Agilent Technologies for more than 25 years and previously for Keithley Instruments. Peterson received a B.S.E.E. and a B.S.Phy. from Cal Poly. [email protected]
