Microcontroller Battery Monitor Circuit Needs Only One Pin
Download this article in PDF format.
This circuit solved a problem encountered in developing a portable device with an ARM Cortex-M0 processor. The power supply consisted of two AA batteries (2 × 1.5 V), and I needed to signal the user about the battery's state. The Cortex-M0 operates from 3.3 V down to 2.0 V, and an AA battery is considered discharged when its voltage drops to 1.1 V, so the available supply is 1.1 V × 2 = 2.2 V. This was a very low-power application that could work down to 2.2 V, so it was not necessary to warn the user to change the batteries until that voltage level was reached.
The microcontroller appears to offer a simple way to measure the battery voltage via its analog-to-digital converter (ADC). However, this did not seem to be a possible solution here, as the Cortex-M0 datasheet says the ADC will only work if its VDDA is greater than 2.4 V (the ARM core operates from 3.3 V down to 2.0 V, but not all of its functions do). Tests showed good results only when VDDA was at least 2.65 V. The obvious solution was to switch to another microcontroller such as a lower-power version, but this would mean rewriting and retesting the code, redoing of the printed-circuit-board layout, and ultimately increase cost in a volume application.
Instead, this circuit was developed to indicate the state of the batteries, using some standard discrete components. The battery monitor needed to:
• Use only one pin of microcontroller (important when using low pin-count device).
• Have very low current drain when in Idle state.
• Use the same pin to switch from Active to Idle state and to read the state.
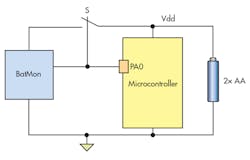
Figure 1 shows how only one pin—PA0—of the microcontroller is used to implement the different functions for the battery-monitor (BattMon) circuit, driving switch S from Idle to Active mode, reading the state of the battery provided from BattMon, and going back from Active state to Idle state.
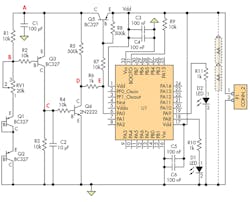
The complete circuit (Fig. 2) is powered by two AA batteries. Every n seconds (or even hours), the microcontroller decides to see if the battery level is over or under 2.2 V. When the microcontroller is not looking to check the battery voltage, it sets PA0 to high level, so Q5 is off. This assures that the current of the BattMon circuit (the blue box of Fig. 1) is very low, which is very important for a portable device. Measured current in this state is approximately 4 µA.
When the microcontroller decides it needs to know the battery voltage, it sets PA0 low for 20 ms and switches Q5 on; this is the time needed to charge the capacitor C1 to VDD – VCESAT(Q5). After the 20 ms period, the microcontroller changes the state of PA0 from “out” to “in” mode, which sets Q5 to off, and for some period (depending on C-R values), the VDD level is held by C1.
If VDD is greater than 2.2 V, then VEB(Q3) is above 0.7 V and Q3 is on; this condition depends on Rv1, Q1, and Q2, which are connected in diode mode and set the voltage at point B. By varying Rv1, we can vary the voltage value at point B and thus the voltage at point A, which changes Q3 from off to on and back. For this test, Rv1 was set to 12 kâ¦. Then, with VDD ≥ 2.2 V, Q3 is on and the voltage at point C goes high, while Q4—which is needed to avoid R3/C2 pulling down point E point when it goes high from 0 to 20 ms—inverts it and produces a low voltage at point E. Thus, if VDD ≥ 2.2V, input PA0 will read a low value.
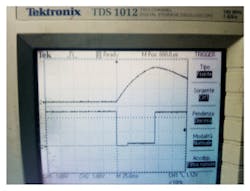
The microcontroller will sample the value at PA0 input 50 ms from the start of procedure (t0 = 0), so it sets PA0 low at time t0 = 0, then sets PA0 to input mode after 20 msc. After 50 ms (from t0 = 0), it samples the value as seen in the bottom trace of Figure 3. The procedure ends with PA0 set to OUT mode and to a high level, which turns Q5 off and reduces the current draw of the BattMon section.
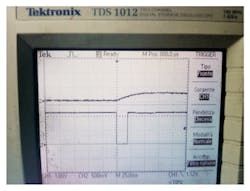
Next, follow what happens if VDD is less than 2.2 V. As before, the sequence starts by setting PA0 low for 20 ms; this switches Q5 to on and charges C1. Next, it changes PA0 from OUT to IN mode, which switches Q5 off and lets C1 hold VDD for some time. But now VDD < 2.2 V, so Q3 stays off because VEB(Q3) < 0.7V, while the voltage at point C stays low and points D and E go high. Therefore, if VDD < 2.2 V, input PA0 will read a high value. Remember, the microcontroller will sample the value at the PA0 input 50 ms from start of procedure as shown in the bottom trace of Figure 4.
Note that the values of R1, R2, R3, R4, and R7 in the circuit are not optimized for performance; they have been optimized for production. It’s possible to speed performance by adjusting the time scale by using 5 ms instead of 20 ms to charge C1, and sampling after 2 to 4 ms. This will reduce the current required in active state, which is important if it’s desired to check the state of the batteries more often.
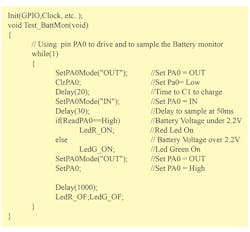
This code segment can be used to test the circuit:
Dr. Ing. Tommaso Angelino earned a Master's in Electronic Engineering (Devices and Circuits) from the Università degli Studi di Napoli Federico II. He has worked at numerous companies and is now a hardware designer at S.E.A. (Sistemi Elettronici Angelino) in Naples, Italy. He can be reached via [email protected].

